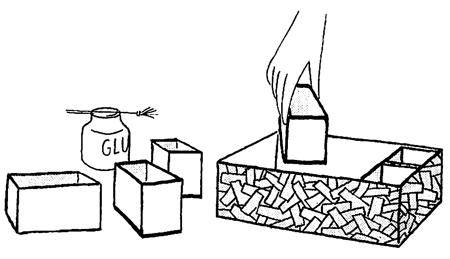
Make Easter Basket with Flower Petals Paper Folding Craft

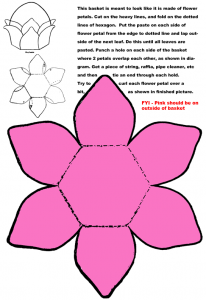
This Easter basket is meant to look like it is made out of flower petals. We have provided a printable paper folding template that you can print out, and then fold up, paste, and make a handle to finish it up. It is pretty and can be used as a decorative table piece or to place flowers or candy in. This is a great craft for boys or girls to celebrate Easter, as well as the April and May season. Have fun.

Make Easter Basket with Flower Petals Paper Folding Craft

Although this craft can be printed on plain office paper, it would be better to print it out on card stock. If you don’t have card stock available…it would be great if you could print it out on cardboard, such as the type that a cereal box is made from.

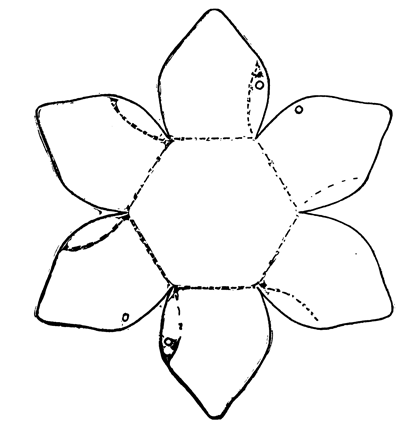
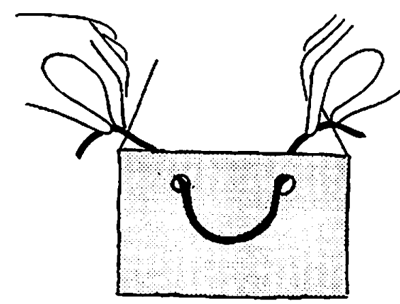
Cut on the heavy lines, and fold on the dotted lines of hexagon.  Put the paste on each side of flower petal from the edge to dotted line and lap outside of the next leaf. Do this until all leaves are pasted. Punch a hole on each side of the basket where 2 petals overlap each other, as shown in diagram. Get a piece of string, raffia, pipe cleaner, etc, and then tie an end through each hold. Try to curl each flower petal over a bit, as shown in finished picture.

[ad#ahc]

Click on Image to Open New Screen and Print Out Template

Technorati Tags: , , , , , , , , , , , , , , ,

Make a Paper Doll House Rocking Chair – Foldable Paper Crafts

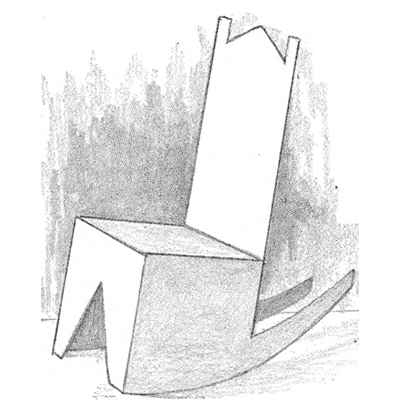
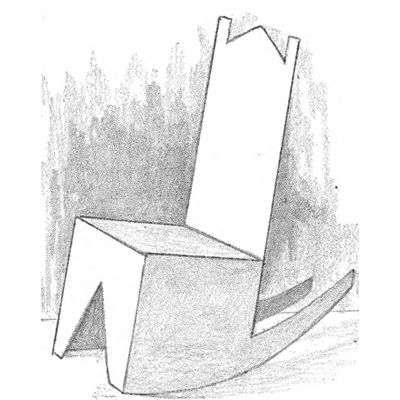
Learn how to take a simple piece of paper and turn it into a doll house sized rocking chair. This is a paper folding arts and crafts project for kids (girls and boys) to make your very own toys….instead of using your money to buy them. We have a lot of paper doll house furniture to post on this crafts blog, so keep an eye open for other doll house furniture as well. Check Out Our Doll House and Doll House Furniture Making Crafts Section for more of the same types of crafts. AND if you want to make a Cool Doll House Out of Old Cardboard Boxes, this is a great crafts tutorial for you.

How to Make Doll House Rockers / Rocking Chairs with Paper Folding Instructions

Step 1

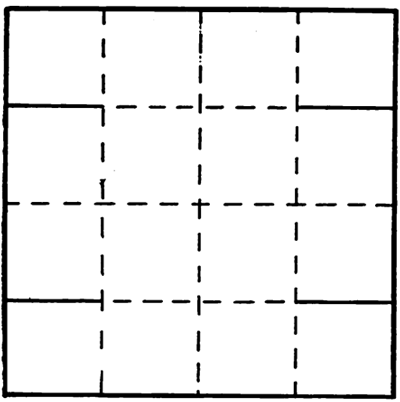
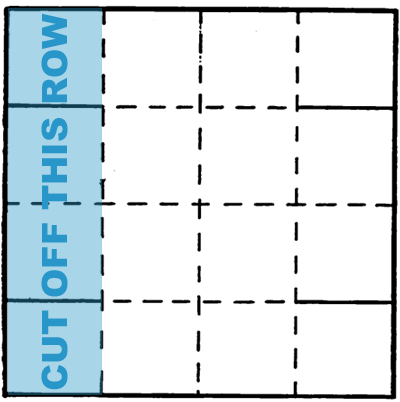
Fold into sixteen squares.

Step 2

[ad#ahc]

Cut off one row of squares.

Step 3

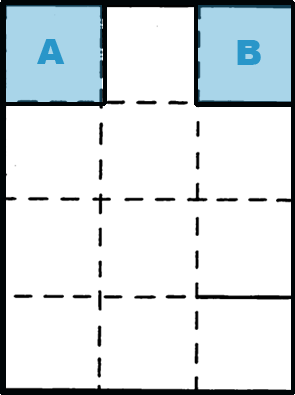
Cut out squares A and B.

Step 4

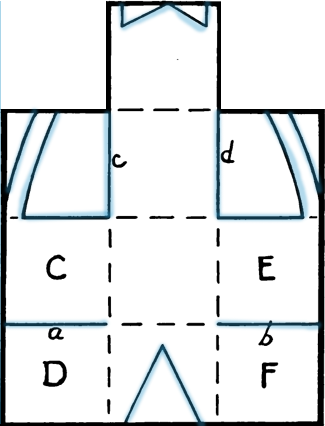
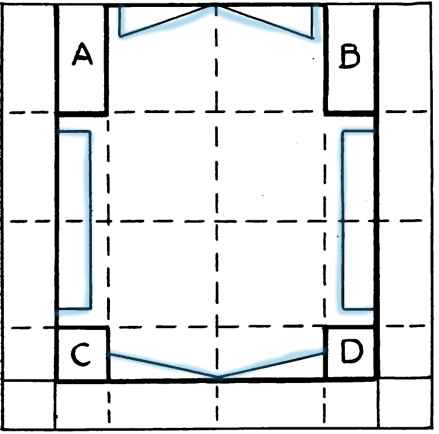
Cut on blue lines.

Step 5

Crease and paste square D to C and F to E.

Step 6

Cut rockers and top of chair.
Check Out Our Doll House and Doll House Furniture Making Crafts Section for more of the same types of crafts. AND if you want to make a Cool Doll House Out of Old Cardboard Boxes, this is a great crafts tutorial for you.

Technorati Tags: , , , , , , , , , , , , , , , ,

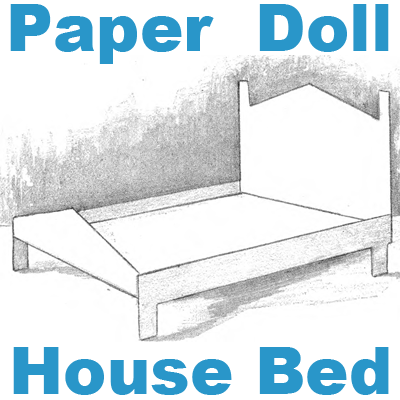
Make a Paper Doll House Bed – Foldable Paper Crafts for Kids

Learn how to take a simple piece of paper and turn it into a doll house sized doll bed. This is a paper folding arts and crafts project for kids (girls and boys) to make your very own toys….instead of using your money to buy them. We have a lot of paper doll house furniture to post on this crafts blog, so keep an eye open for other doll house furniture as well. Check Out Our Doll House and Doll House Furniture Making Crafts Section for more of the same types of crafts. AND if you want to make a Cool Doll House Out of Old Cardboard Boxes, this is a great crafts tutorial for you.

Make a Paper Doll House Bed – Foldable Paper Crafts for Kids

CRAFTS MATERIALS NEEDED:

*Paper, 4-inch square.

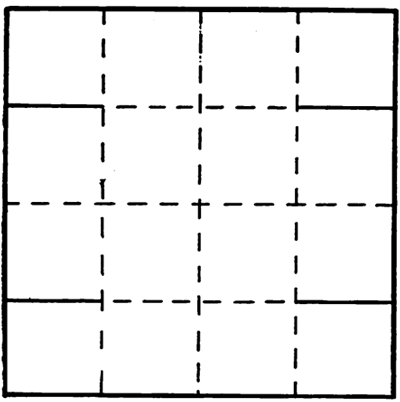
Step 1

Fold paper into 16 squares.

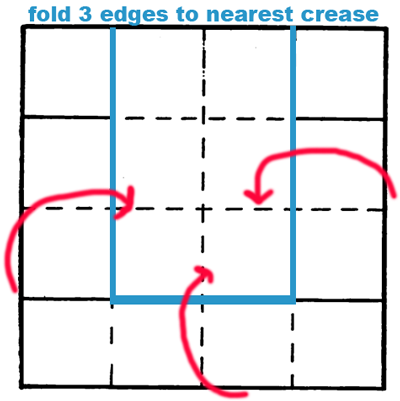
Step 2

[ad#ahc]

Fold edge to crease nearest to it on three sides of the square.

Step 3

Cut on the creases just made (on the blue line).

Step 4

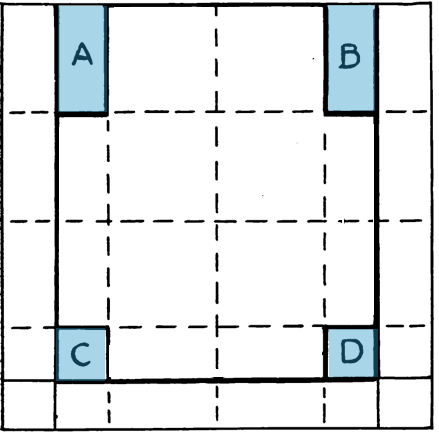
Cut out oblongs A and B and squares C and D.

Step 5

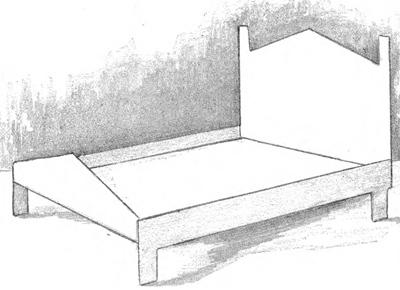
Cut freehand the footboard, the headboard, and the sides to represent the legs.

Step 6

Crease and paste.

Step 7

Separate pieces of paper may be cut out and pasted to represent the sides of the bed.

Check Out Our Doll House and Doll House Furniture Making Crafts Section for more of the same types of crafts. AND if you want to make a Cool Doll House Out of Old Cardboard Boxes, this is a great crafts tutorial for you.

Technorati Tags: , , , , , , , , , , , , ,

How to Make Toy Movie Box Craft for Kids on Rainy Day

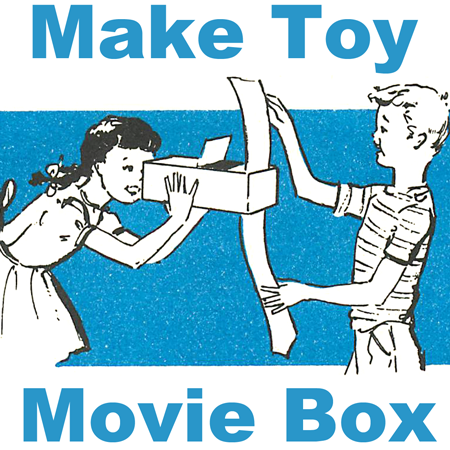
You can make movies out of your comic books or your own drawing, and have loads of fun showing them in this Peep-hole Movie Theater. Learn how to make this toy movie / cartoon show box out of a cardboard box and creativity. Find out how to make your own toy with the following easy directions.

How to Make Toy Movie Box Craft for Kids on Rainy Day

Crafts Materials Needed:

*Shoe-box

*Comic book (or old magazine)

*Scissors

*Paper

*Paste (or Scotch tape)

*Scissor

Directions for Making the Movie / TV Show Box:

You can make movies out of your comic books and have loads of fun showing them in this Peep-hole Movie Theater.

Step 1

[ad#ahc]


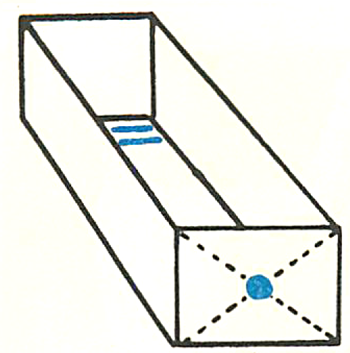
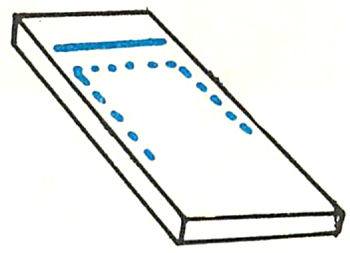
Take the bottom part of a shoe-box. Cut a slit about 1/4 of an inch wide across the bottom of the box, as shown by the colored lines in the picture above. Be sure that the slit is a little shorter than the full width of the box. Then draw two diagonal lines across the other end of the box, as shown by the dotted black lines. Using your scissor, make a peep-hole about 1/2 an inch wide at the point where these dotted black lines cross. This is shown as the solid colored blue spot above.

Step 2

Take the lid of the shoe-box and cut a slit in it directly above the slit in the bottom of the box, as shown by the colored lines in the picture above. Draw three lines, as shown by the colored dotted lines. Cut through the box with your scissor along these lines, to form a skylight.

Step 3

To make a film, cut paper into strips a little narrower than the slits of your movie box. Then paste these strips together to make a film about 36 inches long. Cut out pictures from your comic book, one by one, and paste them on the film paper with paste or Scotch tape.

Step 4

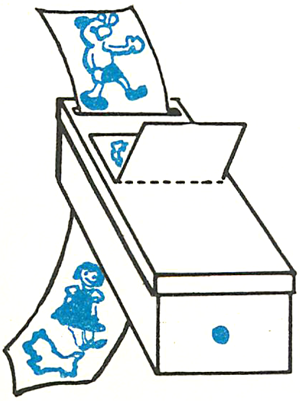
The picture above shows how you slide the end of the film through the slit in the lid and down through the slit in the bottom of the box. Cut the end of the film to a point, as shown above. That will make it easy for the film to slide through the slits. Be sure to raise the skylight when you are showing the movies so that light is thrown on the pictures. Bend up the skylight along the black dotted lines shown above.
Of course you don’t have to show comic book movies. You can paste any sort of pictures on your film, like movie stars, baseball players, etc. Colored pictures look better than black and white pictures, but they all look wonderful through that peep-hole.

Technorati Tags: , , , , , , , , , , , ,

How to Make Cardboard Doll House Furniture with Old Boxes

Today we are going to show you how to make cardboard doll house furniture, decorations, and wall hangings. This is a great activity for a group of girls at a sleepover slumber party, for girl scouts, or for a boring rainy day. Have fun.

Check Out Our Doll House and Doll House Furniture Making Crafts Section for more of the same types of crafts.

How to Make Cardboard Doll House Furniture with Old Boxes

Materials for Doll House Furniture:

*Small cardboard boxes of different sizes (or wooden boxes)

*Scissors

*Paste

*Scraps of materials

*Old magazines

Directions for Making Cardboard Doll House Furniture

[ad#ahc]

You can make sturdy little tables, chairs, beds, bureaus, etc out of all the little boxes that find their way into your house.

Make a Cardboard Doll House Chest of Drawers

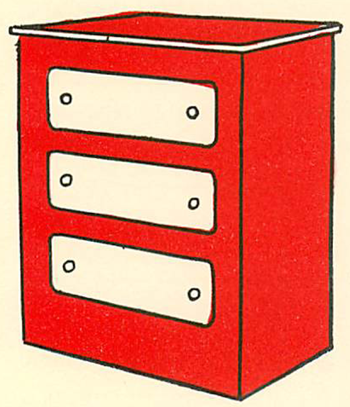
The picture above shows a little box standing on its narrow end. This has been transformed into a chest of drawers simply by outlining drawers and drawer knobs on the face of the box. Put a little bureau scarf made out of a tiny piece of material on top of it.

Make a Cardboard Doll House Cabinet with Doors

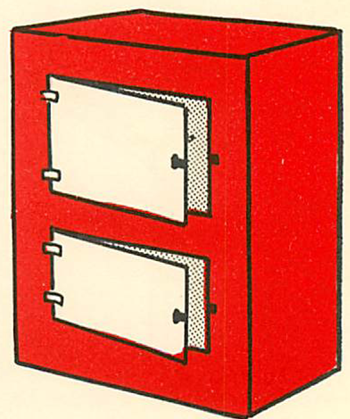
A box of similar shape will make a fine little cabinet with opening doors. The picture above shows how to cut out the cabinet’s doors. Draw little hinges on the uncut side of the doors. Use paper clips for handles.

Make a Cardboard Doll House Table

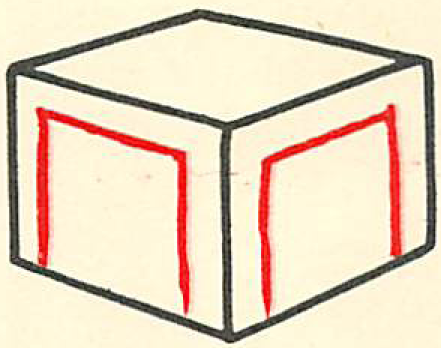
You can make tables of all sizes out of halves of boxes. Just cut out the four sides of your box in the way shown by the colored lines in the picture above.

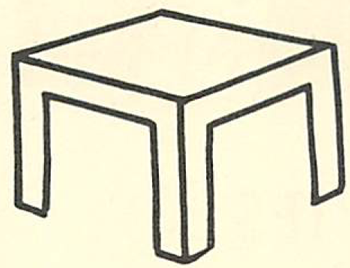
You will then have the sturdy little one-piece table which is illustrated in the picture above.

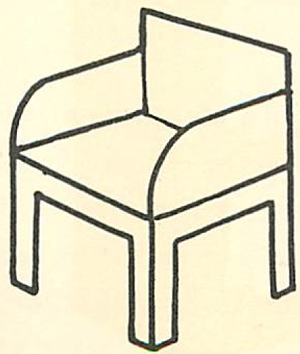
Make a Cardboard Doll House Arm Chair

Here’s how you make an arm chair: Take the lid of a little box and use it to make the table shown in the previous step. This will serve as the bottom half of the arm chair.

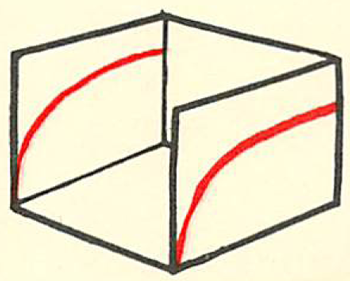
You form the top of the arm chair out of the other half of the box. Cut one of the walls completely away. To shape the arms, draw lines on each side of the facing walls, as shown by the colored lines in the picture above.

Now paste this piece on top of the base and your arm chair will look above.

Other Doll House Furniture and Decorations

To make the bed, paste a piece of pretty  material over a shallow box. Then paste a little ruffle around the sides.

The spice cabinet is made by pasting half a tiny box on the kitchen wall.

You can hang a pocket mirror above the bureau.

Use old magazines to cut out little pictures for the walls. Make rugs out of scraps of cloth or paper.

The previous arts and crafts project that we did was to make a cardboard doll house out of old cardboard boxes.

Check Out Our Doll House and Doll House Furniture Making Crafts Section for more of the same types of crafts.

Technorati Tags: , , , , , , , , , , , ,

How to Make Cardboard Doll Houses from Boxes for Girls & Boys

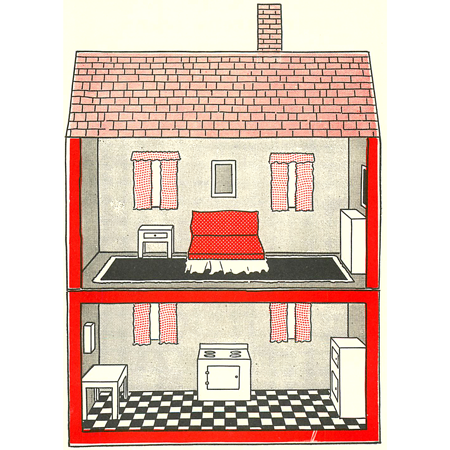
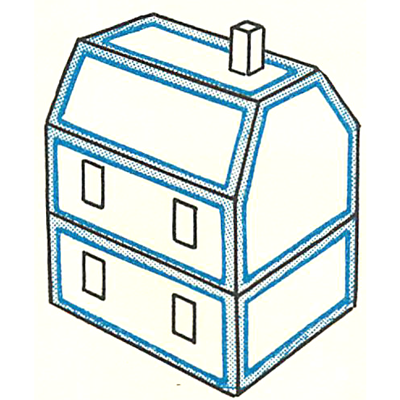
This is a very creative crafts project for children who want to make their very own doll house. It turns out great and it is made out of cardboard boxes. We will also show you how to make cool cardboard furniture for your house. This two-story doll’s house is extraordinarily easy to make. It takes shape quickly and yet it is so sturdy that you will be playing with it for months. You will have great fun furnishing the rooms with the simple but real-looking furniture.

Here is the Next Arts and Crafts Tutorial … Making Cardboard Doll House Furniture from Old Boxes
How to Make Cardboard Doll Houses from Boxes for Girls & Boys

CRAFTS MATERIALS NEEDED:

*2 corrugated cardboard boxes (both the same size and at least 10 inches by 10 inches by 12 inches)

*Gummed paper (or Scotch tape, or adhesive tape)

*If Your Parents Are Helping, Then a Sharp Knife That They Cut With WITH PARENTAL SUPERVISION

OR

*If no parents helping, use a scissor

*Pencil

*Ruler

*4 paper clips

*Crayons (or paints)

EASY INSTRUCTIONS FOR KIDS’ ARTS AND CRAFTS PROJECT

This two-story doll’s house is extraordinarily easy to make. It takes shape quickly and yet it is so sturdy that you will be playing with it for months. You will have great fun furnishing the rooms with the simple but real-looking furniture.

Step 1

Seal one carton closed on all sides with Scotch tape or whatever kind of sealing tape you have. Turn the box, so that the largest sides form the ceiling and floor.

Step 2

[ad#ahc]
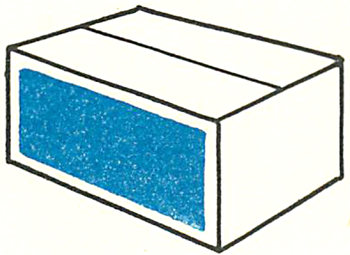

On one of the larger of the four walls, draw a box about 1/2 inch in from the edges, with your pencil and ruler. This box is shown by the solid colored lines in the picture above.

If your parents are helping, have them use a knife to cut along these lines….if not, try using a scissor to cut the cardboard. Push out the piece of cardboard and save it for further use. The picture above shows the colored part, which is removed.

Step 3

You will now be able to reach into the inside of the box. Cut away the two small flaps which are on the floor of the box. Leave the ceiling flaps as they are, but lay a few strips of gummed paper or scotch tape across the ceiling to keep the flaps from falling down.

Step 4
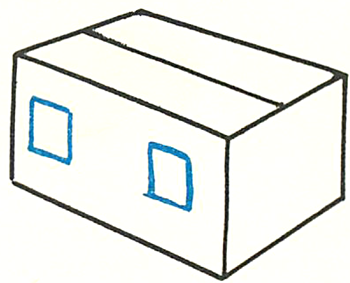
Now draw two small squares on the back wall—the wall opposite the cut-out side—for windows, as shown by the colored lines in the picture above. Cut these out. The ground floor of your house is now completed. Put it aside for the time being.

Step 5
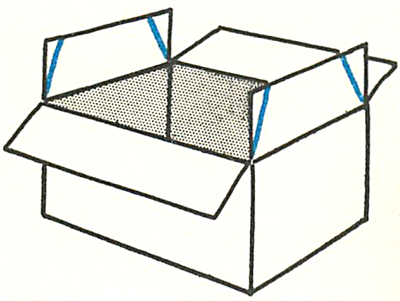
Here’s how you make the second story: Seal only one side of the second box. The sealed side will be the floor of the second story. The open side will form the roof. In order to make a slanting roof, draw two lines on each of the small flaps, as shown by the colored lines in. Cut along these lines.

Step 6
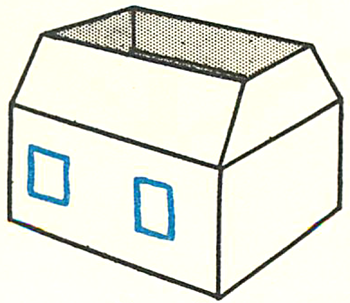
Now stand the four flaps up and make them meet. The two long flaps will slant in and meet the slanted edges of the two smaller flaps, as you can see in the picture above. Seal the four flaps together where they meet. The top of the roof will still be open.

Step 7

Now take this box and cut the front wall and the windows in exactly the same way as you did with the first box. The windows of this second story should be directly above the windows of the first story.

Step 8
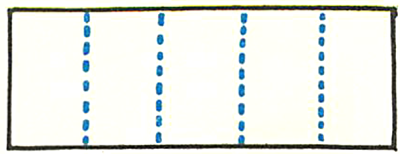

Before you close the opening in the roof, make the chimney out of one of the cut-out pieces of cardboard that you have saved. Cut it to about 5 by 10 inches. Then, with ruler and pencil, divide it into five equal parts, as shown by the colored lines in the picture above. Run your scissor lightly along these lines. Do not cut through the cardboard. Now you will be able to bend the cardboard neatly along these lines.

Step 9
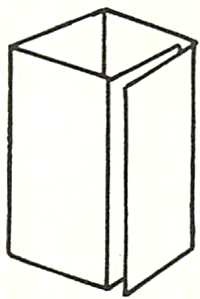
The picture above shows you how to lay and paste the open flaps over each other.

Step 10
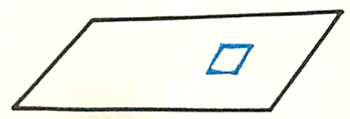
Now take the other piece of cardboard you have saved from one of the cut-out walls. Cut it to exactly the same size as the opening in the roof. Then cut a hole in it for the chimney, as you see in the picture above. Be careful not to cut this hole too large. It’s better if it’s a bit smaller than the chimney, for if you have to force the chimney into this hole, the chimney will stand upright.

Step 11
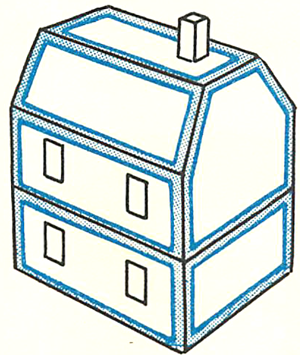
The picture above  shows the chimney in place. It also shows how you then place the top of the roof over the opening. Seal this rooftop in place with gummed paper.

The picture above also illustrates how you place one carton on top of the other with the windows of each story directly above each other. You attach the two stories together by pushing paper clips through the floor and ceiling.

Some of our next tutorials will be how to make some charming cardboard furniture and decorations for your new cardboard Doll House…take a look … Here is the Next Arts and Crafts Tutorial … Making Cardboard Doll House Furniture from Old Boxes

Technorati Tags: , , , , , , , , , , , , , , , ,

Make Bulletin Boards to Organize Family Events

It is so hard to get everything organized and de-cluttered when you have kids. If you have a lot of dates, appointments, grocery list items, messages, and other important facts straight, then why not make a family oriented family board. Making this family bulletin board can help you and your kids more organized and help you remember dates and other important information and appointments. The easy to make instructions are as follows…this is perfect for Moms and Dads to make or for kids to make as a gift for Mom or Dad … or to even make for their own room.

How to Make Bulletin Boards to Organize Family Events with the Following Arts & Crafts Activity for Kids

CRAFTS MATERIALS NEEDED:

*A large piece of heavy cardboard

*Thumbtacks

*Crayons

*Pad

*Pencils

*String

*Calendar

HOW TO MAKE THIS ARTS AND CRAFTS ORGANIZATIONAL PROJECT:

Everyone in the family will thank you for this cool idea!

Step 1

Cut a heavy piece of cardboard about 3 by 4 feet.

Step 2

[ad#ahc]

Draw and color a simple border around the cardboard.

Step 3

Write “Family Bulletin Board”, or any other name you choose, in crayon across the top.

There are many ways you can decorate and arrange this easy-to-make bulletin board. Here are some suggestions:

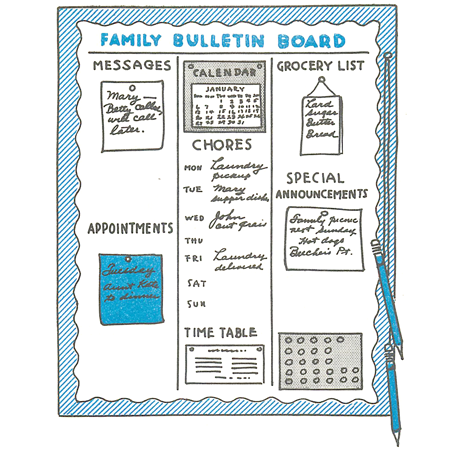
Divide your board with crayon lines into three divisions. Print column headings like “Grocery List”, “Messages”, “Regular Chores”, etc. Under the Grocery List heading, tack up a pad. Tie two or three pencils to strings and tack them up next to the pad.

Draw a box in one corner and push about 20 thumbtacks in it. These will be used for tacking up messages. You might want to print the most important telephone numbers, like Daddy’s phone number or the doctor’s phone number in a space marked “Phone Numbers”.

Tack up a small calendar. Under the heading Chores, you can list the things that are to be done on certain days, like you’re to cut the grass on Fridays, or your sister is to take her piano lessons on Tuesdays, or the laundry is to be called for on Mondays.

It is nice to record family appointments like picnics and visiting grandma in a box headed “Special Announcements”. You’ll find that everyone in the family will make much use of your very practical bulletin board.

Technorati Tags: , , , , , , , , ,

Make Picture Folder Gift with Accordion Fold Out Photo Holder

This is a special arts and crafts project for kids who want to make a special gift for Mom or Dad for a gift for Mother’s Day or Father’s Day. This is a fold-out, accordion-style photo book / folder. You can either use real photos or make your own comic book or use pictures from a magazine to make a funny story. This is a great craft to build imagination or to give as a gift to a loved one or friend.

How to Make Picture Folder Gift with Accordion Fold Out Photo Holder Craft Idea for Kids

CRAFTS MATERIALS NEEDED:

*About 6 sheets of paper (old letterheads, writing paper, shelf paper)

*A jar of paste

*old pictures from magazines or special photos

*scissors

*pencil (or crayons)

EASY DIRECTIONS FOR THIS ARTS AND CRAFTS ACTIVITY

You can have a wonderful time making up this picture folder, either with a friend or by yourself.

Step 1

[ad#ahc]

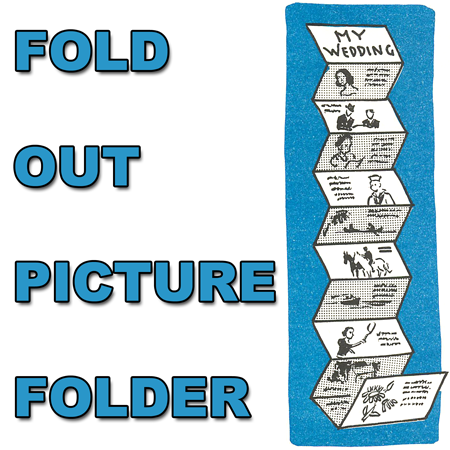
Paste 6 or 8 sheets of paper together, end to end, the long way. The picture above shows you how to do this. This will make a very long strip of paper.

Step 2

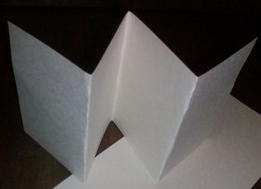
Fold this, accordion fashion, leaving about 4 inches between each fold, so that you will have 12 to 16 spaces. To fold accordion style, you fold forward then backwards, forwards, then backwards…see the picture above.

Step 3

Now choose whether you want to make this with family or friend photos to give to a loved one or friend as a gift or whether you want to make this a fun, fictional, made up comic book or story.

Directions for Making Fold Out, Accordion Style Photo Book Folder

Now just paste special pictures or photos on to each page. The Fun Part is Making Clever or Funny Captions. Make sure that it is okay to use special photos on this photograph project. ASK YOUR MOM OR DAD FIRST!!!!

OR

Directions for Making a Fictional – Fun Story Picture Folder or Fold Out Comic Book

A picture folder is going to be made. The first thing you must do is choose a subject. Let’s suppose that the idea you’re going to work on is “My Life as a Movie Star.” Cut out appropriate pictures for your subject from old magazines. Then paste these pictures on the accordion folder, one picture on a square. You print a title on the folder for each picture. This will be loads of fun because you will be creating a story.
For example, if you decide on “My Life as a Movie Star,” the first picture might be that of a crying baby. It could be entitled “How I looked when I first went into the movies.” The next picture could be that of an older baby in a carriage, which you might call “When I won first prize in the Atlantic City Baby Parade.” In this way, you follow the subject through the years with a picture pasted on each space of your Accordion Folder. Of course, you can use both sides of your folder, as shown in the picture.
Some good subjects are: “My Experiences as a Flyer;” “My Wedding;” “My Summer Vacation;” “When I Was an Explorer.”
It’s great fun to make up a humorous folder. Cut out comic pictures and give them humorous titles. For instance, you might entitle a picture “My Student Days at State College,” the picture being that of someone sleeping deeply, apparently snoring loudly. If you made up a whole folder of this type, you could display it at a party. Your friends will have great fun reading it. They, very likely, will start making up folders themselves as soon as possible, and you’ll be starting a very enjoyable fad.

Technorati Tags: , , , , , , , , , , , , , , , , ,

Make Your Own Easter Cards with Easter Eggs Craft Idea

It is time to start thinking about making Easter cards for your friends and loved ones. Here is an easy idea for all you kids out there who want to start making your Easter greeting cards. This is a really cool looking card with an Easter egg filled with glitter…and everyone will love the great results. This is a great activity for preschoolers, toddlers, and kids of all ages.

Make Your Own Easter Cards with Easter Eggs Craft Idea

CRAFTS MATERIALS YOU WILL NEED:

*6 sheets pink, yellow, or blue construction paper, about 8 1/2″ X  by 11″

*12 square envelopes

*yellow, blue, lavender construction paper

*tape measure

*tracing paper

*colored crayons

*pencil

*scissors

EASY DIRECTIONS FOR MAKING YOUR HANDMADE EASTER CARDS

Step 1

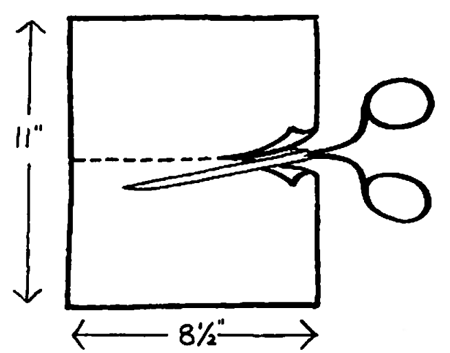
Cut the six sheets of paper in half.

Step 2

[ad#ahc]

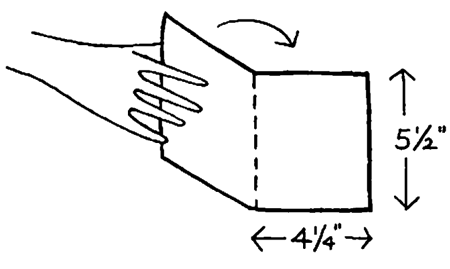
Fold these 12 pieces in half so that each card is 41/4 by 51/2 inches.

Step 3

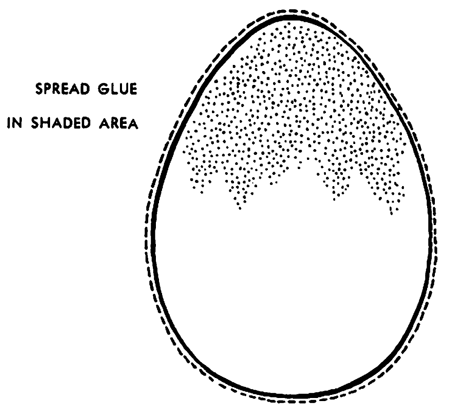
Trace the illustration of the Easter egg. Then put the tracing paper on the other pieces of paper and cut out twelve Easter eggs. Paste one in the center of each card.

Step 4

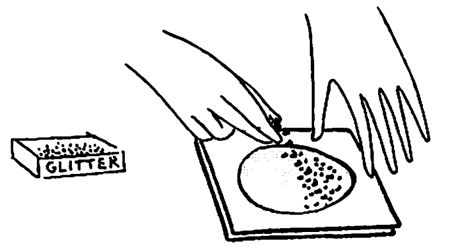
Put a little glue on top of the Easter egg and sprinkle a little glitter in the places where you put the glue. Let it dry and then shake off the excess glitter.

Step 5

Write your Easter message with colored crayons inside the card, and put one card under the flap of each of the envelopes. Wrap them in a gift package and send them out at least a month before Easter. On the package write OPEN BEFORE EASTER

Technorati Tags: , , , , , , , , , , ,

Make Sewing Box with Step by Step Instructions for Mother’s Day

If your Mother or Grandmother is a big sewer, embroiderer, etc and has a lot of thread, needles, and other sewing supplies, then why not make them a sewing box? Sewing boxes make great Mother’s Day gifts as well as presents for birthdays and other special occasions.  Below you will find easy step by step instructions for putting together a great sewing box. Good luck.

Make Sewing Box with Step by Step Instructions : Make for Mom and Grandma for a Great Gift for Mother’s Day

CRAFTS MATERIALS YOU WILL NEED:

*empty shoe box

*heavy yarn or cord scraps of gift wrapping paper

*small boxes, of any size

*rubber cement, or other glue

*nail and hammer or paper punch scissors

*tape measure

*shellac

*brush

DIRECTIONS FOR MAKING SEWING BOXES:

Step 1

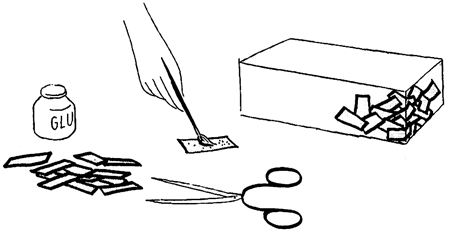
Glue decorative paper all over the shoe box and the cover in patchwork-quilt fashion. The scraps of paper can overlap one another, be upside down or right side up. Put a coat of shellac all over the box.

Step 2

[ad#ahc]

Cover the insides and outsides of the bottoms of smaller boxes (a cheese box, kitchen match box, for instance) with scraps of gift wrapping paper also in patchwork-quilt fashion and see where they fit into the shoe box. Glue them into the box. They will hold yarn spools, small scissors, thimble, and other sewing tools.

Step 3

About 2 inches from the top of the box, in the middle of each side, punch out two holes about 3 inches apart, for the handles of the box. Pull through two lengths of heavy yarn or cord and on the inside make triple or quadruple knots. The box is then finished. If you have money to spare, buy some yarn spools, a thimble, a package of needles, and two or three skeins of embroidery yarn.

Technorati Tags: , , , , , , , , , , , , , , ,

Make Recipe Books for Recipes for Mom on Mother’s Day

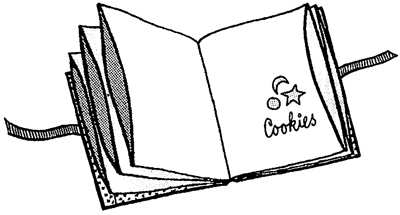
What Mom or Grandmother doesn’t love getting a personalized recipe book? This one is so special too….It is completely filled with envelopes so your Mom or Grandma can put recipes that they find in magazines or books, and keep them all in one categorized place. Make this for Mother’s Day, for a gift on a birthday, or any other reason you have to show love to your family and friends. Have fun.

Make Recipe Books for Recipes for Mom on Mother’s Day

CRAFTS MATERIALS YOU WILL NEED:

*notebook, 8Y2 by 11 inches

*decorative paper

*2 pieces of ribbon, each 8 inches long

*glue

*colored pencil

*scissors

*tape measure

DIRECTIONS FOR MAKING RECIPE FILE BOOK:

Step 1

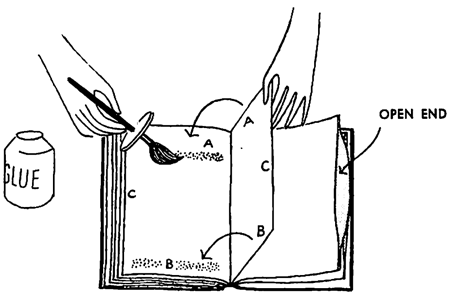
Paste two pages together on two sides (marked A and B in drawing) and leave side C open. Repeat this until you have 24
“envelopes” in the notebook. Mark each envelope with the kind of recipes to be kept there—Appetizers, Soups, Meats, Fish, Vegetables, Desserts, Drinks, Sandwiches, etc.
[ad#ahc]

Step 2

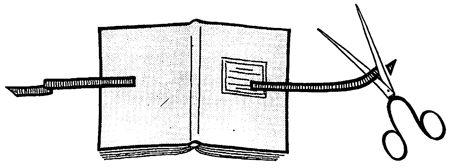
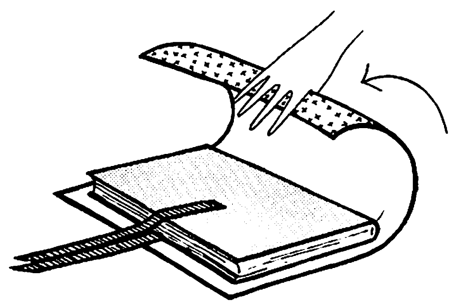
Glue the pieces of ribbon onto the center of the back and front covers of the notebook.

Step 3

Glue decorative paper onto the covers. Cut the ends of the ribbon on the bias, to prevent fraying. You can make the same file for patterns, bills, or personal letters.

Make Pot Holders Gift for Mom on Mother’s Day

This is a great craft for older children, girls, and teens. This is a more complicated arts and crafts project than many of our other crafts ideas, so read over the following craft before deciding to do it. This pot holder craft would make a great gift for Mom or Grandma on Mother’s Day. Pot holders are great gifts for anyone who loves their kitchen and cooking. Good luck.

Make Pot Holders Gift for Mom on Mother’s Day

CRAFTS MATERIALS THAT YOU WILL NEED:

*2 round scraps of decorative flannel, denim, or other heavy cotton fabric about 8 inches in diameter

*2 old wash cloths or good pieces of old toweling

*piece of ribbon, 5 inches long

*embroidery yarn

*thread

*bias tape

*scissors

*tape measure

*needle

*kitchen bowl, 8 inches in diameter

*chalk

*tracing paper

*pencil

*pins

DIRECTIONS FOR MAKING POT HOLDERS:

Step 1

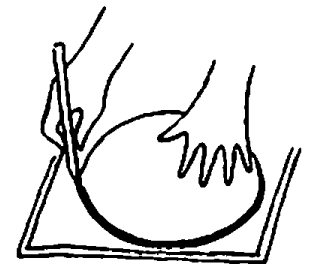
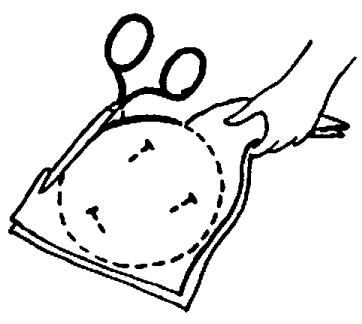
Put the kitchen bowl on top of the decorative fabric and draw around it with chalk. Do the same with a double piece of old towel or two wash cloths.

Step 2

Cut the material where it is marked with chalk.

[ad#ahc]

Step 3

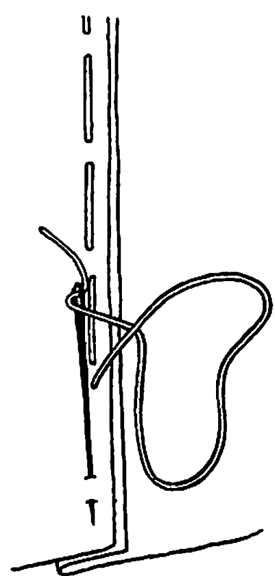
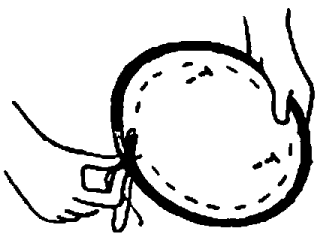
Put one circle of decorative fabric on the table, then the two circles of toweling, and last the other circle of decorative fabric. Baste them all together.

Tip : How to Sew the Basting Stitch (How to Baste)

This is not a permanent stitch. It holds two pieces of material. together while another, stronger, stitch is being sewn. Make a knot at the end of your thread. Make large running stitches, about 1/2 inch apart, on a straight line. End with a few backstitches, sewn one on top of the other. When your permanent stitches have been made, cut the basting stitches every few inches and pull out all the threads.

Step 4

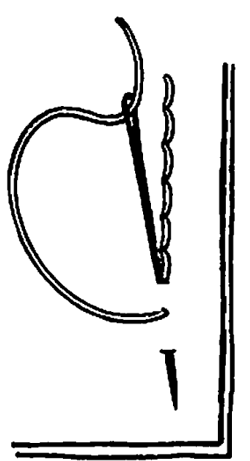
Sew the bias tape around the basted circles with a backstitch and be sure the needle catches both sides of the tape.

Tip : How to Sew the Backstitch

Begin sewing this stitch with three or four little stitches sewn one on top of the other. Make a little stitch backwards on the upper part of the two pieces of fabric you are sewing together, and then make a longer stitch forwards on the under part of the two pieces of fabric you are sewing together. Bring the needle back on the upper part of the two pieces of fabric where the last stitch ended and then push it forward again on the under part of the two pieces of fabric you are sewing. Do this until the seam is completely done and finish it with three or four small backstitches one on top of the other.

Step 5

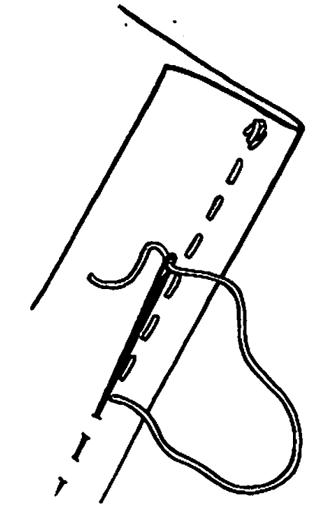
Transfer with pencil the illustration of a cooking pot to your tracing paper. Pin the tracing paper in the center of the circle and embroider the outline of the pot with a running stitch. Be sure the needle and thread go through all the layers of fabric, because then the embroidering will also quilt the material. When the embroidery is done, take out the pins and gently tear off the tracing paper.

Tip : How to Sew the Running Stitch

Begin sewing this stitch with three or four little stitches sewn one over the other, instead of making a knot in the thread. The running stitch itself is a small, even stitch, running on a straight line. Try to make each stitch about 1/8  inch long, though if it is closer to 1/4 of an inch no thunder or lightning are going to strike you. You can run up to six of these little stitches on the needle and then pull the needle .through the fabric. Finish your seam with three or four little stitches sewn one on top of the other.

Step 6

Fold the 5-inch length of ribbon in half and sew it on the edge of the pot holder so it can be hung on a kitchen hook.

If you liked the pattern that we had on our pot holder, click on the image below, and print it out and transfer it to your pot holders’ fabric.

Click on This Image to Open it In a New Page to Print

Good Luck.

Technorati Tags: , , , , , , , , , , , , ,

How to Make Eye Glasses Cases – Crafts Idea for Kids
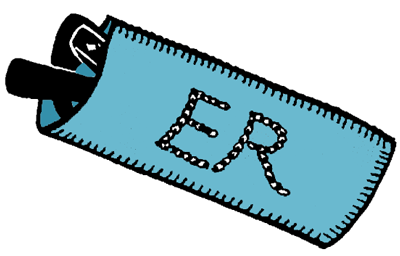
Do you need a gift idea for Mom on Mother’s Day or Dad for Father’s Day or for somebody’s birthday? If your loved one or friend wears glasses, why not make them an eye glasses case? It is easy to make and you can personalize the case with the person’s name or initials. Find the easy to make crafts / sewing instructions below.
How to Make Cases for Eye Glasses  with Easy  Crafts Idea Instructions for Kids
CRAFTS MATERIALS THAT YOU WILL NEED:

piece of felt, about 6 by 7 inches package of paper for cleaning glasses gold, silver, or colored thread
scissors; tape measure; needle; chalk

EASY DIRECTIONS FOR MAKING EYE GLASS CASES

Step 1

Cut the felt into two pieces, 3 by 7 inches each.

Step 2

[ad#ahc]

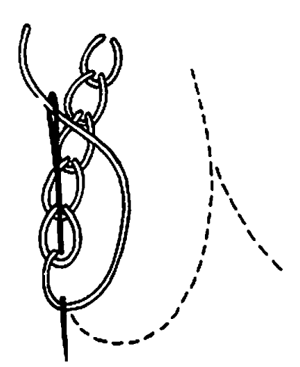
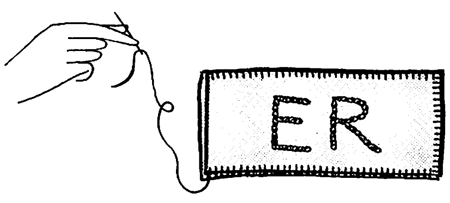
In the center of one of the pieces of felt, sketch with chalk, but very lightly, the initials of the person to whom you will give this gift. Embroider the initials with a chain stitch.

Tip : How to Sew Chain Stitch

Make a knot at the end of your thread. Put the needle in the fabric as for a running stitch. When the point is through and the eye is still out, bring the thread under the point of the needle. Then draw the needle all the way through to form a loop. For the next chain stitch, and those after that, put the needle in right next to the place where the thread came out, bring the thread under it again to form a loop, and continue doing so until the chain stitch is done.

Step 3

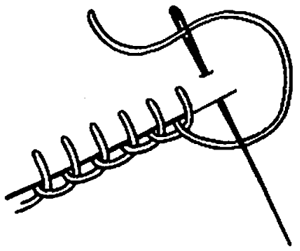
Sew the pieces of felt together on three sides with a blanket stitch. One side will remain unsewn, for the glasses to be put in.

Tip : How to Sew Blanket Stitch

To blanket stitch, make a knot at the end of your piece of thread. Put your needle in Y4 inch from the edge of the fabric, put the thread under the point of the needle and then pull the needle with the rest of the thread through. Repeat until finished.

Step 4

When you are finished, put in the case a package of Sight-Saver papers, sold in all drugstores and dime stores, so that the recipient of the gift can clean the glasses.

Technorati Tags: , , , , , , , , , , , , ,

Make Earrings with Sea Shells for Mom on Mothers Day

Sea Shell earrings turn out beautifully and they are very simple to make. Below you can find easy instructions for putting together earrings that are made from sea shells and earring clips. These would make a great gift for Mom or your Grandmother on Mother’s Day. They would look beautiful placed in a gift box that is filled with beach sand. Have fun.

How to Make Earrings with Sea Shells for Mom on Mothers Day : Crafts for Kids

CRAFTS MATERIALS YOU WILL NEED:

* 2 sea shells, not larger than 3/4 inch in diameter

* 2 earring clips or screws

*tweezers

* Duco cement glue (or other glue that works on sea shells and metals)

EASY DIRECTIONS FOR MAKING SEA SHELL EARRINGS

Step 1

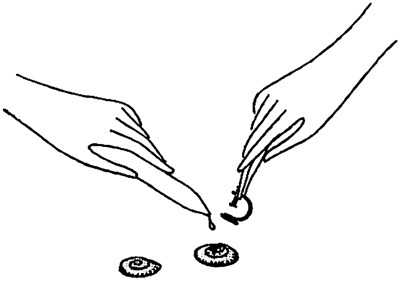
Put the two sea shells on the table, with their backs facing you. Squeeze out a few drops of Duco cement onto the shells.

Step 2

[ad#ahc]

Using the tweezers, pick up the sea shells and put them very gently on top of the earring clips or screws, right in the center. Let the cement dry. Pack the earrings in a small box. It would be nice if you put some fresh white cotton in the bottom of the box, to highlight the earrings.

Technorati Tags: , , , , , , , , , , , , , , , ,

Make Cosmetics Case for Girls or as a Gift for Mom on Mother’s Day

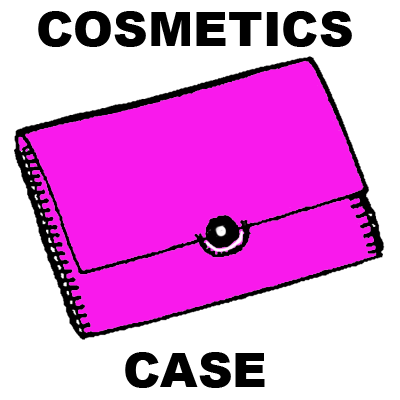
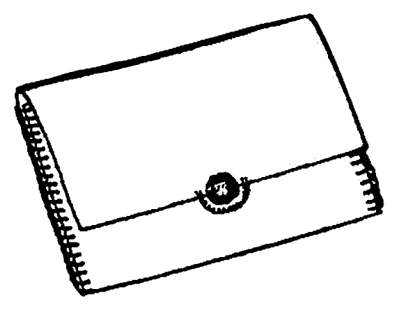
This is an easy sewing project with easy illustrated instructions to make a make-up / cosmetics case. Girls and Teens will love making this cosmetics bag / case / wallet – whatever you want to call it. It is also a great project to make for Mom or Grandma on Mother’s Day…and it would also be a great group project for Summer Camp or Girl Scouts. Easy directions follow the picture below.

CRAFTS MATERIALS YOU NEED:

* 8-by-13 inch piece of medium-weight fabric such as butcher linen, denim, or flannel

* thread to match the fabric

*one button

*embroidery yarn to contrast with the fabric

*needle

*scissors

*tape measure

DIRECTIONS FOR MAKING YOUR NEW COSMETICS CASE

Step 1

Hem the piece of fabric on all sides.

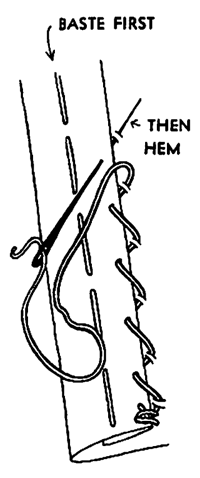
Hemming is done so that the rough edges of the fabric do not show. First fold under 1/2 inch of the fabric and press down the crease with your hand or press it against the edge of a table or working counter. Then fold the fabric again, 1/2 inch for a regular hem, 1 inch for a wide hem. Press down the second crease with your hand. Baste the fold about 1/4 inch from the first fold. To sew the hem permanently make small, slanting stitches right near the first fold. Push your needle all the way through the folded fabric and just enough farther to get hold of a tiny piece of the right side of the fabric—the side that will show—and then push the needle back through the folded edge. Begin and end your hemming stitch with two or three little back-stitches, one on top of the other.

[ad#ahc]

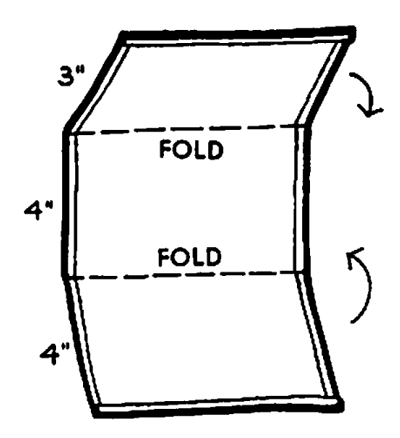
Step 2

Fold the fabric in three parts, so that two parts measure 4 inches each and the third part measures 3 inches.

Step 3

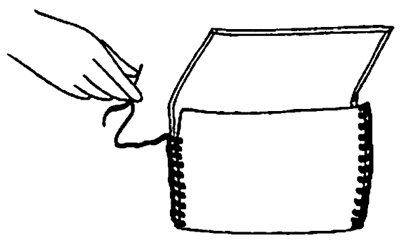
Sew the folded fabric with a blanket stitch as indicated in the illustration above.

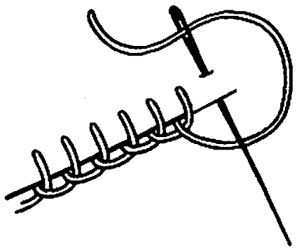
Tip : How to Sew Blanket Stitch

To blanket stitch, make a knot at the end of your piece of thread. Put your needle in 1/4 inch from the edge of the fabric, put the thread under the point of the needle and then pull the needle with the rest of the thread through. Repeat until finished.

Step 4

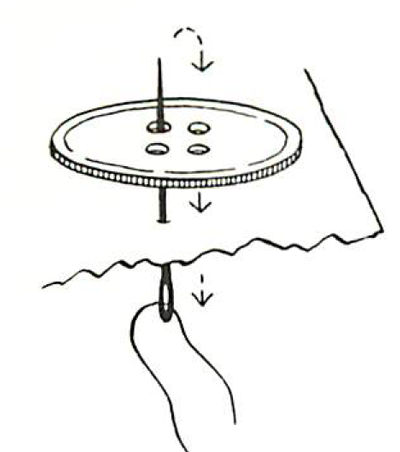
Make a loop for the button, as shown in the illustration, in the center of the overlapping piece of fabric. Sew on the button at the center of the bottom part of the folded fabric.

This is what the finished cosmetics / make-up case should look like.

Technorati Tags: , , , , , , , , , , , , , , , ,

How to Fold a Standing Paper Goose and Duck with Paper Arts Instructions

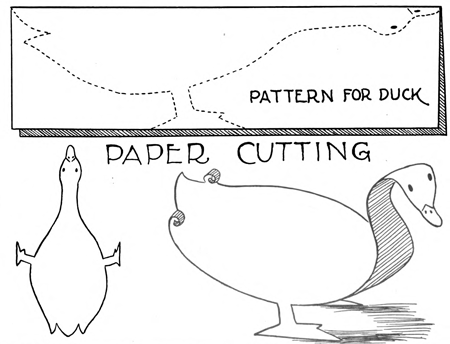
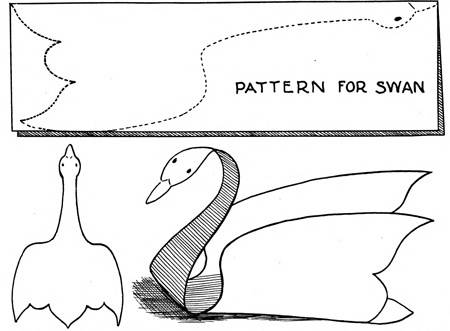
Spring is here so it is is a great time to make ducks and geese and other creatures and critters to celebrate the new season. Today I have provided you with 2 patterns, one for a stand-up paper duck, and one for a stand-up paper goose. Just print out the pattern, fold it in half, cut it out, and stand it up…it is as easy as that.

How to Fold a Standing Paper Goose and Duck with Paper Arts Instructions

[ad#ahc]

Stand-up Paper Duck Pattern

Print the pattern (BELOW). Fold the page in half and cut out the duck shape. Then you will have a duck shape as seen on the picture above (LEFT). Fold the neck as seen in the picture above and the fold the wings in a bit so that the duck is standing.

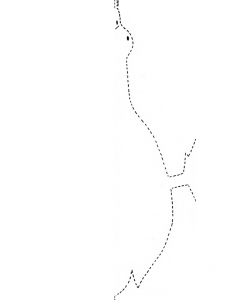
Click on This Pattern to Open up a New Page to Print Out

Stand-up Paper Goose Pattern

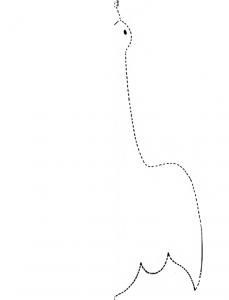
Print the pattern (BELOW). Fold the page in half and cut out the goose shape. Then you will have a goose shape as seen on the picture above (LEFT). Fold the neck as seen in the picture above and the fold the wings up so that the goose is standing on its own.

Click on This Pattern to Open up a New Page to Print Out

Technorati Tags: , , , , , , , , , , , , ,