Drawing Games Ideas for Kids : Doodling Pencil and Paper Boredom Busters

Today we will show you a handful of drawing games that anybody can do with a friend and a piece of paper and pencil. Here are some fun ideas for a rainy day when you need some boredom busters.

Drawing Games Ideas for Kids : Doodling Pencil and Paper Boredom Busters

Drawing Games Ideas for Kids : Doodling Pencil and Paper Boredom Busters

Many people, when a drawing game is suggested, ask to be excused on the grounds that they can’t draw. But in none of the games that are described in this article is any real drawing ability needed. The object of each game below is to just have fun, not to draw well. Besides, when somebody makes a bad drawing, it is more likely to lead to good-natured laughter than a good drawing.


FIVE DOTS DRAWING GAME

All children will like this drawing game. You take a piece of paper and make five dots on it, wherever you like—scattered about far apart, close together (but not too close), or even in a straight line. The other player’s task is to fit in a drawing of a person with one of these dots at his head, two at his hands, and two at his feet, as in the examples below.

Drawing Games for Kids

Drawing Games in Our New Book

drawing games and activities activity book for kids

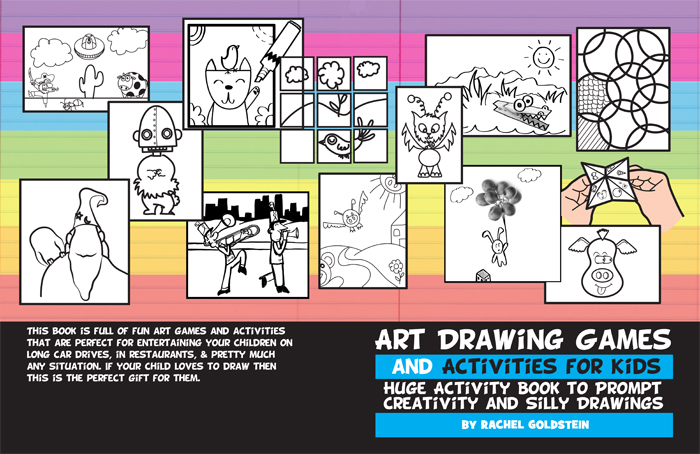
This book is over 200 pages long and it is filled with drawing games and activities. Here is the page for that.

OUTLINES DRAWING GAME

Another form of ” Five Dots ” is ” Outlines.” Instead of dots a line, straight, zigzag, or curved, is made at random on the paper. Papers are then exchanged with friends and this line must be fitted naturally into a picture, as in the examples below.

OUTLINES DRAWING GAME

Click on the Image Above to See This Image Bigger

Smudgeographs

While on the subject of novel albums the ” Smudgeograph ” might be mentioned. The smudgeograph is the effect produced by writing one’s signature with plenty of ink, and while the ink is still very wet, folding the paper down the middle of the name, lengthwise, and pressing the two sides firmly together. The result is a curious symmetrically-shaped figure. Some people prefer smudgeographs to ordinary signatures in a visitors’ book.

Drawing Tricks

Six drawing tricks are illustrated below.

Six drawing tricks are illustrated below

One (1) is the picture of a soldier and a dog leaving a room, drawn with three strokes of the pencil. Another (3) is a sailor, drawn with two squares, two circles, and two triangles. Another (5), Henry VIII., drawn with a square and nine straight lines. Another (6), invented by Mr. Morrow, an Eskimo with a harpoon, drawn with eleven circles and a straight line. The remaining figures are a cheerful pig and a pig (4), and a cat (2), simply drawn.

Composite Animals

In this game the first player writes the name of an animal at the top of the paper and folds it over. The next writes another,  and so on until you have four, or even five. You then unfold the papers and draw animals containing some feature of each of those named.

Invented Animals

A variation of this game is for the players to draw and describe a new creature. On one occasion when this game was  played every one went for funny names. The best animal produced was the Hairy Coco, the description of which stated, among other things, that it was fourteen feet long and had fourteen long feet. Below see an example of one of the animals created…

Drawing Games Inventions

Heads, Bodies, and Tails

For this game sheets of paper are handed around and each player draws at the top of his sheet a head. It does not matter in the least whether it is a human being’s or a fish’s head, a quadruped’s, a bird’s, or an insect’s. The paper is then turned down, two little marks are made to show where the neck and body should join, and the paper is passed on for the body to be supplied. Here again it does not matter what kind of body is chosen. The paper is then folded again, marks are made to show where the legs (or tail) ought to begin, and the paper is passed on again. After the legs are drawn the picture is finished.

Picture to Order

Each player sits, pencil in hand, before a blank sheet of paper, his object being to make a picture containing things chosen by the first player before him. The first player then names the thing that he wants in the picture. Perhaps it is a tree. He therefore says, ” Draw a tree,” when all the players, himself included, draws a tree. Perhaps the next says, ” Draw a boy climbing the tree ‘ ; the next, ” Draw a balloon caught in the top branches ” ; the next, ” Draw two little girls looking up at the balloon ” ; and so on, until the picture is full enough. The chief interest of this game resides in the difficulty of finding a place for everything that has to be put in the picture. A comparison of the drawings afterwards is usually amusing.

Pictures and Titles

Each player draws on the upper half of the paper an historical scene, whether from proper history or from family history, and makes up a title, writing it along the bottom of the paper and folding it over. The drawings are then passed on and each player writes above the artist’s fold (or on another sheet of paper) what he thinks they are meant to represent, and folds the paper over what he has written. In the accompanying example the title at the bottom of the paper is what the artist himself wrote ; the others are the other players’ guesses.

Pictures and Titles

Various Descriptions of the Drawing Above

The Abbot of Christchurch, near Bournemouth, surveys the scaffolding of the abbey.

An old man coming back to the home of his childhood, looks across the river, where a duck is swimming, to the dilapidated cathedral and town which represent the stately piles he remembered.

The building of the Ark.

The Artist’s Description

The Last Man surveying the ruins of the Crystal Palace.

Hieroglyphics Game

As a change from ordinary letter-writing, ” Hieroglyphics ” are amusing and interesting to make. The best explanation is an example, such as is given on pp. 46 and 47, the subject being two verses from a favourite nursery song.

Hieroglyphics Game

Hieroglyphics Game

I hope that you enjoyed this list of drawing games.

Technorati Tags: , , , , , , , , , , , , ,

How to Make Pinball Machine Game from Old VCR Tapes Craft

Today we will show you how to make a pinball machine out of an old – recycled VHS / VCR tape. This is a fun craft for older kids and teens.

You might want to check out our other pinball machine making craft

How to Make Pinball Machine Game from Old VCR Tapes Craft

How to Make Pinball Machine Game from Old Recycled VCR Tapes Craft

Crafts Materials Needed

– VCR Tape
– Screw Driver
– Paper
– (optional) Glue Gun (Parental Supervision or Help) or Glue
– (optional) Stickers

Step 1

Step 2 : Making VCR Tape Pinball Machines in Easy Crafts Step

Take the screws out of the vcr / vhs tape to open it up.

Step 2

Step 3 : Making VCR Tape Pinball Machines in Easy Crafts Step

Open up the casing so that the vhs tape looks like this. You can make a Rubber Band Powered Car Out of the 2 Spools if You want.

[ad#ahc]

Step 3

Step 4 : Making VCR Tape Pinball Machines in Easy Crafts Step

Take everything out of the vhs tape so that it looks like this. Store all of the parts as you will use them later.

Step 4

Step 5 : Making VCR Tape Pinball Machines in Easy Crafts Step

Bend the metal part to look like a check mark, as pictured above.

Step 5

Step 6 : Making VCR Tape Pinball Machines in Easy Crafts Step

Use scissors to cut a slit, as pictured above.

Step 6

Step 7 : Making VCR Tape Pinball Machines in Easy Crafts Step

Put check mark through slit and glue it there from the outside of the tape.

Step 7

Step 9 : Making VCR Tape Pinball Machines in Easy Crafts Step

Now cut a hole directly under neath the hole that you see in the metal pieced-check mark that we just glued to the tape.

Step 8

Step 8 : Making VCR Tape Pinball Machines in Easy Crafts Step

Now take a paper clip…

Step 10 : Making VCR Tape Pinball Machines in Easy Crafts Step

And unfold it so that there is a loop on one and … then stick the straight end through the hole in the vhs tape and the metal check mark..

Step 9

Step 11 : Making VCR Tape Pinball Machines in Easy Crafts Step

Now fold the paper clip around the check mark to keep it connected.

Step 10

Step 12 : Making VCR Tape Pinball Machines in Easy Crafts Step

Now glue small parts to inside of the vhs tape for barriers.

Step 11

Step 14 : Making VCR Tape Pinball Machines in Easy Crafts Step

Take the part of the vhs tape that looks like this and…

Step 15 : Making VCR Tape Pinball Machines in Easy Crafts Step

Glue it to the bottom, back side of the tape for a bit of a tilt.

Step 12 (Optional)

Step 16 : Making VCR Tape Pinball Machines in Easy Crafts Step

to make spinners…fold little pieces of paper and fold them like an accordion…backwards and forwards, backwards and forwards…

How to Make Pinball Machine Game from Old VCR Tapes Craft

Then glue the starting piece to the ending piece to form a star like shape.

Finished Pinball Machine

How to Make Pinball Machine Game from Old VCR Tapes Craft

I decorated the pinball machine with stickers to make it more fun to look at…but these are optional.

You can use beads or candy to shoot up into the pinball machine…just pull the paper clip down and release.

Now notice that there are numbers on the board. When the marble, or bead or candy lands on one of the barriers, they get that number of points.

You might want to check out our other pinball machine making craft

Here are some other Pinball Making Tutorials Online that will give you some great ideas. Read them below

How to Make a Simple Pinball Machine

FETCH! Pinball Wizard

Design Your Own Pinball Machine.

Use Your Creativity to Make More Obstacles

Fire the marble out of the cannon / plunger by lowering the pencil a bit, putting the marble in the top of the cannon, and then pull the pencil down, and let go. Now hit the flipper to keep the ball up in the air longer. Write the number of points that you get with each turn down on a piece of paper. However…make your pinball machine the way that you WANT it to be…no the way that I want mine to be like.

Have fun!

Technorati Tags: , , , , , , , , , , , , , , , , , , ,

How to Make Rubber band Powered Toy Dump Trucks and Cars Lesson

Today we will show you how to make a rubber band motored dump truck, cars, or other vehicles. It is much easier than you think it would be and it is a lot of fun figuring out ways to make it roll faster or just smoother. If you like a challenge, then go on and find out how to make this rubber band powered vehicle.

How to Make Rubber band Powered Toy Dump Trucks and Cars Lesson

How to Make Rubber band Powered Toy Dump Trucks and Cars Lesson

Crafts Materials Needed

– Plastic Container or Cardboard Box
– Rubber Bands
(optional) Glue Gun (Parental Supervision or Help)
– If can’t use glue gun, then other glue
– Electrical Tape or Duct Tape or Strong Tape
– Old Markers for the Axles (parts that hold the wheels) (however, you can use chopsticks or something else if you want)
– Materials for Wheels (I used Spray Butter Caps and VCR Spools but you can use plastic caps or something else)
– Materials for Top of Truck and Dump Truck Part (I used Disposable plastic and styrofoam containers from around my house)

Step 1 (If You Want to Use VCR Spools)

How to Make Rubber band Powered Toy Dump Trucks and Cars Lesson

Make sure this is a VCR tape that isn’t used any more!! Rewind the tape. Take the screws out of the VCR tape.

How to Make Rubber band Powered Toy Dump Trucks and Cars Lesson

Open up the VCR tape and take out the 2 white / clear spools. You need to take the tape off of the wheels….this is annoying but these are amazing wheels!

These are what the wheels look like now.

[ad#ahc]

Step 2

If you are using old markers for the axles then glue 2 together.

Step 3

Now glue the cap part to the inside of one of the vcr spools.

Step 4

Now poke 2 holes in the truck’s base (mine is a large plastic container).

Make these holes opposite of each other for the back wheels.

Step 5

Now stick the markers through these holes…make sure that the markers looks like they go through the container evenly.

Step 6

Now glue another cap on the end of the marker that doesn’t have a wheel yet. After that is glued, glue the last vcr spool on to that cap.

Step 7

Now lets make the front wheels. I used butter spray caps. Glue the bottom of a marker to the center of the cap.

Glue another marker to the top of the first marker.

Step 8

Now the side that needs a wheel will have a cap on it. Since the cap has a hole in it, I couldn’t get it to glue down to the spray butter cap. But it glued VERY well when I first put electrical tape on the cap and THEN glued it. Try this and hopefully it will work great for you.

Step 9

I then took electrical tape and secured all of the markers together  – just in case.

Step 10

Now cut a hole in the front of the car. I secured the hole with electrical tape so that the hole wouldn’t get bigger with use.

Step 11

Now for the rubber band part of the tutorial. Take a few rubber bands…I used 3. You will need to connect them together like I did above. You loop one around another rubber band and then you pull it through its own self, and then you pull…look at the above pictures to help you.

Do this with all 4 rubber bands.

Step 12

Now wrap it around the markers and pull it through itself.

Electrical tape the rubber band on the back axle.

Then pull it to the front of the car and tie it a few times to make sure that it is secure.

Step 13

To make sure that the car works (before adding to its looks)…get onto the floor (might only work on the rugs if your wooden floors are slippery) and roll the back wheels towards yourself as you crawl backwards. When you feel tension and it feels like it is harder to use, then let go…it should drive all by itself.

Step 14

Now put the plastic cap on the container and then glue the front of the truck onto the surface of the container (in my case I used a mushroom container).

Step 15

I cut out the front of the mushroom container so my kids  can put people in there.

Step 16

To make a dump truck, just tape a plastic container (or cardboard box) on to the back of the truck, but only tape it on the side that is closest to the back of the truck. Now you have a dump truck.

See….

Step 17

How to Make Rubber band Powered Toy Dump Trucks and Cars Lesson

If you want to, you can paint it or draw on it. I also placed the cut-out window part for a decoration on the top of the truck.

I hope that you had fun like I did!

Technorati Tags: , , , , , , , , , , , ,

How to Make a Super Mario Wooden Suitcase From Clementines Boxes Crafts Idea

Today we will show you how to make an old-fashioned looking wooden suitcase out of Clementines Boxes and Wooden Thread Spools. You can decorate the box with any cartoon characters that you want, but my son is obsessed with Nintendo and Super Mario Bros characters so I decided to make this for him. He LOVES it…and I hope you will too. The illustrated instructions can be found below.

By the way…Yes, it does open and close. The pieces fit together so snugly, that you don’t even need a strap to keep it closed.

How to Make a Super Mario Wooden Suitcase From Clementines Boxes Crafts Idea

How to Make a Super Mario Wooden Suitcase From Clementines Boxes Crafts Idea

Crafts Materials Needed

– 2 Wooden Clementines Boxes
– Screwdriver (Prying out Staples with Parental Help)
– Elmer’s Glue
(optional) Glue Gun (with Parental Help)
– Duct Tape
– Wooden Spools
– Magazine Cutouts

Step 1

Step 1 : Making Wooden Suitcases Arts and Crafts Idea for Kids

Take out 2 Clementines Boxes (or other wooden fruit boxes).

Step 2 : Making Wooden Suitcases Arts and Crafts Idea for Kids

There are 4 wooden posts in each clementines box. With parental supervision or permission, take a screwdriver and pry out the staples to take out the 4 posts.

[ad#ahc]

Step 3 : Making Wooden Suitcases Arts and Crafts Idea for Kids

Now you have all 4 posts out.

Step 2

Now glue all 4 sides back together. If your parents are around have them hot glue the sides together so you don’t have to wait for the glue to dry.

Step 3

Step 4 : Making Wooden Suitcases Arts and Crafts Idea for Kids

After the glue has dried, the boxes should fit together now, like the above picture.

Step 4

Step 5 : Making Wooden Suitcases Arts and Crafts Idea for Kids

Now stick duct tape all long the bottom so that the bottom of the boxes looks like this.

Step 6: Making Wooden Suitcases Arts and Crafts Idea for Kids

If you take the boxes apart, this is what it should look like from the inside.

Step 5

Step 7 : Making Wooden Suitcases Arts and Crafts Idea for Kids

To make the handles…use will be using all 4 posts that you took out in step #1.

If you glue 2 posts together, you will get a rectangle like the white illustration above.

Then take 2 spools and glue them to the box as seen above…notice that they are slightly off the box in to the center of the box….Then glue 1 rectangle to the top of each set of spools.

Step 6

Step 8 : Making Wooden Suitcases Arts and Crafts Idea for Kids

Cut out all the pictures that you want to glue to the box. My son loves Super Mario Bros and Donkey Kong and Scribblenauts so I made sure to cut out a lot of those video games characters.

Step 7

Step 9 : Making Wooden Suitcases Arts and Crafts Idea for Kids

We aren’t just going to glue these to the box, we are going to use a process called decoupage.

Decoupage (or découpage) is the art of decorating an object by gluing colored paper cutouts onto and object and then sealing it with a varnish over and over again until it is sealed. It will appear as if it is part of the wood or object.

So take some Elmer’s glue (or any brand obviously) and make a mixture of 50% water and 50% Elmer’s Glue.  Mix it together with a paint brush. Or if you have Modge Podge use that (something that they sell at crafts stores.

Step 8

Step 10 : Making Wooden Suitcases Arts and Crafts Idea for Kids

Brush your  mixture directly on to your suitcase surface.

Step 9

Step 11 : Making Wooden Suitcases Arts and Crafts Idea for Kids

Now start sticking on your pictures, making sure to brush the glue mixture onto the pictures as you put them down. Put more pictures down, continuing to brush the glue mixture all over the surface.

Step 12 : Making Wooden Suitcases Arts and Crafts Idea for Kids

Wrap pictures all around the box…making sure to put plenty of glue mixture all over everything. Make sure to flatten the pictures out and not to make it so wet that there are globs.

Let it dry and then put another coat on. I put 4 coats on … each time letter it dry in between putting more coats on.

Finished Nintendo Suitcase

How to Make a Super Mario Wooden Suitcase From Clementines Boxes Crafts Idea

This is my son’s finished suitcase…he loved it and all my kids want me to make one for them or to help them make one…so I guess we need to eat a LOT of Clementines (I have 4 kids) . I hope that you had fun.

Technorati Tags: , , , , , , , , , , , , , , ,

How to Make a Mini Mikado Game with Easy Crafts Activity for Kids

Mikado is a very old pick-up sticks game. It is also a very funny and captivating game that most kids will love. Today we will show you how to make a miniature Mikado Game Set with toothpicks and paint. This is easily transported so it would be great for playing in hotels while traveling. Have fun.

How to Make a Mini Mikado Game with Easy Crafts Activity for Kids

How to Make a Mini Mikado Game with Easy Crafts Activity for Kids

Mini Mikado is made of 31 toothpicks. Every stick have a number of points:

• Mikado, 1 blue stripe, 20 points, 1 stick
• Mandarin, 3 yellow stripes, 10 points, 5 sticks
• Bonzen, 2 orange stripes, 5 points, 5 sticks
• Samurai, 3 green stripes, 3 points, 10 sticks
• Kuli, 2 red stripes, 2 points, 10 sticks

CRAFTS MATERIALS NEEDED :

– 31 toothpicks
– 1 zip-lock sachet
– paints
– paintbrush

Step 1.

First, we’ll make Mikado, the most important stick, so, with blue paint …

… make 1 blue stripe on the middle of the toothpick. Let it dry.

Step 2.

Now is the Mandarins time : with yellow paint make 3 stripes on the middle of the toothpick.

We must have 5 Mandarins so make another 4 toothpicks with yellow markings.

Let them dry.

[ad#ahc]

Step 3.

To make the 5 Bonzen sticks make 2 orange stripes on 5 toothpicks.

Let them dry.

Step 4.

What’s next? Oh, yes, 10 Samurai. With green paint make 3 markings on the middle of 10 toothpicks.

Let them dry.

Step 5.

We have 10 Kuli to do so, with red paint make 2 markings on the last 10 toothpicks.

Let them dry well and the game is ready.

How to Play Mini Mikado Game

The sticks are bundled and taken in one hand that touches the table/ground.

The release creates a circular jumble.

Now one stick after another should be taken up without moving/touching others. The take away could be by hand, possibly through pressing on a stick’s tip or if one has already picked up a special stick (Mikado/Mandarin), it could be used as a helper, possibly to throw up another stick.

It is allowed to stand up on but not to leave the own place. A bad throw could be rerun and the rules should be kept strict in respect to moving sticks to enjoy the game.

On a fault the turn ends (the last stick taken is not counted). The next player bundles and drops the sticks again. After several rounds, normally five, the one with the highest score is the winner.

Storing Our Mini Mikado Game

Let’s keep the sticks in the zip-lock sachet to be sure we don’t lose them.

Technorati Tags: , , , , , , , , , , ,

How to Make Duct Tape Tote Bags with Easy Steps Crafts Tutorial for Kids

Today we will show you how to make a very sturdy tote bag out of nothing other than duct tape. This duct tape bag is able to hold about 30 hard covered library books without tearing. You can also make these for grocery shopping so that you don’t have to waste plastic and paper bags. Learn how to make this cool duct tape bag with the following steps below.

How to Make Duct Tape Tote Bags with Easy Steps Crafts Tutorial for Kids

How to Make Duct Tape Tote Bags with Easy Steps Crafts Tutorial for Kids

Crafts Materials Needed

– Duct Tape
– Scissors

Step 1

We aren’t going to give you any specific measurements because we don’t know how big or small you want your bag. I wanted a huge bag to hold my library books, but you might just want a normal sized tote bag.

Firstly, we make the fabric. The way that we make the fabric is by sticking tape together, stick end to stick end.

When you have one strip done, then take another piece of tape and stick it lengthwise along the finished strip (illustrated above).  Then turn it around and cover up the sticky part with another piece of tape the same size.

Step 1 : Making Duct Tape Tote Bags Kids Arts and Crafts Instructions

Make 2 rectangles about the same size (it is optional to make them 2 different colors) and one long rectangle that is a little bit longer than the combined height of both of the other rectangles that you made.

Step 2

Step 2 : Making Duct Tape Tote Bags Kids Arts and Crafts Instructions

Now duct tape them together like the picture above….the long strip in the middle and 2 around it as if it ere a bird or airplane.

[ad#ahc]

Step 3

The above illustrations show you how you will need to tape the sides together. You might need an extra hand to do this so ask a friend or parent or sibling if you need some help.

Step 3 : Making Duct Tape Tote Bags Kids Arts and Crafts Instructions

Here is a picture of me taping the sides together.

Step 4

Step 6 : Making Duct Tape Tote Bags Kids Arts and Crafts Instructions

I taped together the strap by taping end to end pieces of  tape. I then cut a hole in the bag, pulled the strap through and taped from the outside and the inside of the bag. It seems to hold really well.

Finished Duct Tape Tote Bag.

How to Make Duct Tape Tote Bags with Easy Steps Crafts Tutorial for Kids

The finished tote bag.

Technorati Tags: , , , , , , , , , , ,

How to Make Twist Tie Doll Figures with Moving Arms and Legs Crafts Idea for Kids

If you want to make your very own play dolls out of recycled twist ties, then find out how to. They come out really cool, with hug-gable & twist-able arms and legs … especially cool for Mom dolls that hug baby dolls. Find out how to make these from unused items around your house. Have fun.

How to Make Twist Tie Doll Figures with Moving Arms and Legs Crafts Idea for Kids

How to Make Twist Tie Doll Figures with Moving Arms and Legs Crafts Idea for Kids

Crafts Materials Needed

– Embroidery Thread or Floss
– Glue
– Scissors
– Twist Ties
– Markers or Paints

Step 1

Step 1 : Making Play Figures Figurines and Dolls Crafts Project

Take a twist tie and bend it in half.

Step 2

Step 2 : Making Play Figures Figurines and Dolls Crafts Project

Now take a second twist tie and bend it in half around the first twist tie…

[ad#ahc]

Step 3

Step 3 : Making Play Figures Figurines and Dolls Crafts Project

and then wrap it around like this so you have 2 arms.

Step 4

Twist the first twist tie, below the arms, so it looks like this (after spreading the legs out).

Step 5

Now glue one end of embroidery thread / floss to the top of the figure…we are going to make the head. When you start wrapping the thread, make sure to leave a little of the twist tie at the top (the loop), unwrapped so you can put the hair through it at the end.

Step 6

Keep wrapping it around the head and put a bunch of glue on it when you feel you are done…cut the end and push the end down.

Step 7

Wrap a different color for the shirt….wrap all around the arms and chest….put a bunch of glue down, cut, and push the end of string down…You can fold the hands over the shirt if you want to.

Step 8

Choose another color for the pants and wrap the string all around the legs and thighs…cut and glue down. You can then fold the feet over.

Step 9

Fold some string and then push it through the loop at the top of the head.

Step 10

Step 10 : Making Play Figures Figurines and Dolls Crafts Project

You can either braid it or cut the ends off so the hair hangs better.

Step 11 : Making Play Figures Figurines and Dolls Crafts Project

Like this.

Step 12 : Making Play Figures Figurines and Dolls Crafts Project

Or braided like this.

Finished Miniature Doll Figurines

How to Make Twist Tie Doll Figures with Moving Arms and Legs Crafts Idea for Kids

You can paint or draw faces on them if you want to.

This is what the finished dolls look like. The neat thing is that the arms can bend around other figures to hug. I used a smaller twist tie for the baby and a long garbage bag twist tie for the Mommy figure.

Technorati Tags: , , , , , , , , , , , , , , ,

How to Make Valentines Day Pop Up Card of Girl Hugging Heart Crafts Idea for Kids

Today, we will show you how to make this really cool Valentine’s Day Pop Up Card craft for kids. Learn how to fold and cut paper to make a pop-up card with a girl hugging a Valentine’s Day heart. People will love receiving this card…so learn how to make it.

Here are Even More Valentines Day Crafts Ideas

I love you Pop Up Cards

How to Make Valentines Day Pop Up Card of Girl Hugging Heart Crafts Idea for Kids

Crafts Materials Needed

– Paper
– Scissors
– Glue
– Coloring Stuff … Colored Pencils or Watercolors or Markers or Crayons, etc

Step 1

Step 1 : Making Valentines Day Pop Up Cards Instructions

Take 2 normal sized pieces of paper and fold them in half length-wise, as you see above.

Step 2

Step 2 : Making Valentines Day Pop Up Cards Instructions

Draw 2 curved lines … this will be the girl’s face.

[ad#ahc]

Step 3

Step 3 : Making Valentines Day Pop Up Cards Instructions

Draw 2 more upwards curved lines along the fold. Don’t draw them beyond the half-way mark (seen above).

Step 4

Step 4 : Making Valentines Day Pop Up Cards Instructions

Cut on the lines that you just drew and then fold them back, as pictured above.

Step 5

Step 5 : Making Valentines Day Pop Up Cards Instructions

Now just put them back in the original position as if you didn’t even cut them. And you are done…just kidding.

Step 6

Step 6 : Making Valentines Day Pop Up Cards Instructions

Now open the paper as if it is a tent and push the cut segments through to the other side of the paper, as pictured above.

Step 7

Step 7 : Making Valentines Day Pop Up Cards Instructions

Now close paper together and press.

Step 8

Step 8 : Making Valentines Day Pop Up Cards Instructions

Now open up the card to see the pop-up head and arms …. it should look like the picture above.

Step 9

Step 9 : Making Valentines Day Pop Up Cards Instructions

Draw a face and hair on the head. You don’t have to draw a girl…you can draw a boy, if you want to.

Step 10

Step 10 : Making Valentines Day Pop Up Cards Instructions

Now draw arms and hands on the curved-‘u’ looking section. Just draw 2 curvy letter ‘m’ shapes for fingers.

How to Make Valentines Day Pop Up Card of Girl Hugging Heart Crafts Idea for Kids

Here is what it should look like so far.

Step 11

Step 11 : Making Valentines Day Pop Up Cards Instructions

Now we have to make a heart for the girl to hold in her arms. So get a piece of paper and fold it in half. Then draw half of a heart on the fold and cut it out.

Write a message on the heart…such as ‘Happy Valentine’s Day’ or ‘I Love You’ or ‘Be Mine’.

Step 12

Step 12 : Making Valentines Day Pop Up Cards Instructions

Now glue the heart inside of the hands.

Step 13

How to Make Valentines Day Pop Up Card of Girl Hugging Heart Crafts Idea for Kids

This is what the card looks like closed. After the glue dries…it should look like the pictures below.

Step 16

How to Make Valentines Day Pop Up Card of Girl Hugging Heart Crafts Idea for Kids

Here is what it should look like with the heart in the girl’s arms.

How to Make Valentines Day Pop Up Card of Girl Hugging Heart Crafts Idea for Kids

And another picture. I hope that yours turned out great too!

Here are Even More Valentines Day Crafts Ideas

Technorati Tags: , , , , , , , , , , , , ,

How to Make V Shaped Arrows Friendship Bracelets Illustrated Instructions

Today I will show you how to make this amazing friendship bracelet that has a letter ‘v’ pattern within it. This bracelet pattern is a bit more difficult than normal friendship bracelet instructions, so you will need a free afternoon to make this one. If you are still interested, find the illustrated instructions below.

You Might Enjoy Our Other Friendship Bracelets Crafts Too

How to Make V Shaped Arrows Friendship Bracelets Illustrated Instructions

How to Make V Shaped Arrows Friendship Bracelets Illustrated Instructions

Crafts Materials Needed

– Embroidery Floss (preferred) or Yarn
– Scissors
– Optional – Cardboard
– Optional – Doll Pins or Sewing Pins

Measuring the Embroidery Thread for your Bracelets

Step 1 : Making Flat Wide Friendship Bracelets Craft for Girls

To measure the lengths of your threads, take a piece and hold it from your hand to your shoulder. This is one arm’s length of thread. However, you need 2 arms lengths for each thread, so just use the first arms length of thread to measure out a 2nd arms length. Look at the picture above to see how I folded the string over to get the 2nd arms length.

Use this first string to measure out 3 more strings. You need 4 different colors for this bracelet.

Step 2

Step 2 : Making Flat Wide Friendship Bracelets Craft for Girls

Find 4 different colors of strings…each 2 arms lengths. Put them each end to end and then smooth them out.

[ad#ahc]

Step 3

Step 3 : Making Flat Wide Friendship Bracelets Craft for Girls

Now fold the threads in half like in the picture above.

Step 4

Step 4 : Making Flat Wide Friendship Bracelets Craft for Girls

We are now going to make a loop at the end to make a clasp type feature to tie the bracelet together after it is done.

Do this by holding the top of the string in a loop and then holding a bit down with your other hand, but keeping your index finger out.

Then take the loop-holding hand and wrap the string around your index finger of the other hand.

Step 5

Step 5 : Making Flat Wide Friendship Bracelets Craft for Girls

Now, with the index finger hand, pinch the circle that was just created on the index finger….pinch it where the threads cross.

Step 6

Step 6 : Making Flat Wide Friendship Bracelets Craft for Girls

Now slip the circle off of the index finger.

Step 7

Step 7 : Making Flat Wide Friendship Bracelets Craft for Girls

Pull the loop through the pinched circle.

What my loop looks like

This is what my loop looks like.

The Way That is Easiest to Work

Before we start making our friendship bracelet, let me show you the way that I worked on this. I took a cut-out piece of cardboard, 2 pins, and a clip, and put them together like in the picture above. I took the clip and hooked it on the loop…to hold it down. I took the 2 pins to keep strings out of the way while I worked. It worked out AMAZINGLY. I wish I had done this when I was a child, I used to work with just tape and this works so much better.

Step 9

Step 8 : Making Flat Wide Friendship Bracelets Craft for Girls

Okay, now lets start. You should have 8 strings hanging out from the bottom of the loop. Spread them out like I did above…like in a mirror image.

In this project, we will call the strings on the left, the left strings. We will call the strings on the right, the right strings.

It might help you to take some crayons or colored pencils and map out your colors on paper…just the way that I did above, so you don’t get confused.

Step 10

Step 9 : Making Flat Wide Friendship Bracelets Craft for Girls

Now we will start on the left side strings. Put the right-side strings up on the pin to get them out of the way.

On the left side strings, we will go from left to right….so the blue string (string #1) will be the knotting string…in other words, the string that we will be making knots with.

Form a letter ‘L’ with the blue string…as pictured above.

Step 11

Step 10 : Making Flat Wide Friendship Bracelets Craft for Girls

Now tuck the blue string under the yellow string and into gap between blue and yellow string. You are making a knot, think of the way that you tie a knot on your show lace, however in this case, always make sure the knotting string (blue) goes over and then under the string you are knotting over (yellow) before pulling.

Step 12

Step 11 : How to Make V Shaped Arrowhead Bracelets

Now pull the blue string up until a beautiful blue knot is made. Make sure to hold the yellow string down, and that not other strings get in the way while pulling.

Step 13

Step 12 : How to Make V Shaped Arrowhead Bracelets

Do the same exact thing over again to make a double knot.

Step 14

Step 13 : How to Make V Shaped Arrowhead Bracelets

Notice that you made 2 blue knots on the top of the yellow string.

Notice that the blue string is now in place #2.

Now we will knot the blue string over the pink string.

Step 15

Step 14 : How to Make V Shaped Arrowhead Bracelets

Knot the blue string over the pink string twice to make a double knot.

Step 16

Step 15 : How to Make V Shaped Arrowhead Bracelets

Now this is what your friendship bracelet will look like now.

Step 17

Step 16 : How to Make V Shaped Arrowhead Bracelets

Now double knot the blue string over the orange string.

Step 18

Step 17 : How to Make V Shaped Arrowhead Bracelets

Now this is what your friendship bracelet will look like. You are now done with the left-side strings…for now.

Step 19

Step 18 : How to Make V Shaped Arrowhead Bracelets

Now take all of the left-side strings and put them on the left pin to get them out of the way.

Fan out the right-side strings in the correct order…in the mirror image that you created in step #9 of this tutorial.

Step 20

Now we are making knots with the blue string on the right side.

This time, we are going from right to left.

Form a backwards letter ‘L’ with the blue string over the yellow string.

Step 21


Pull the blue string up over the yellow string, under it and through the gap between the 2 strings. Pull it up and make a blue knot. Do this a second time to make a double knot.

Step 22

Next we will pull the blue string over the pink string and make 2 blue knots over the pink string.

Step 23

Here I show you the process of making the blue knots over the pink string.

Step 24

This is what your bracelet looks like now.

Step 25

Lets now make the blue knots over the orange string.

Step 26

This is what your strings look like now. You are now done on the right (typo on the picture above where it says left).

Step 27

Step 19 : How to Make V Shaped Arrowhead Bracelets

Now we are done with the right side and we have to knot the 2 blue strings together in the middle to make the ‘v’ shape.

Step 28

Step 20 : How to Make V Shaped Arrowhead Bracelets

Double knot the 2 blue strings together.

Step 21 : How to Make Friendship Bracelets Tutorial with Pictures

This is what your letter ‘v’ shaped arrow shape looks like.

Step 29

Step 22 : How to Make Friendship Bracelets Tutorial with Pictures

Now lets start all over again but with the yellow string as the knotting string.

Knot over the pink, orange, and blue strings on the left-strings side.

Step 23 : How to Make Friendship Bracelets Tutorial with Pictures

Knot over the pink, orange, and blue strings on the left-strings side. This is what it should look like.

Step 30

Step 24 : How to Make Friendship Bracelets Tutorial with Pictures

Now put the left-side strings over the pin to get them out of the way.

Now fan out the strings on the right side. We will now double knot the yellow string over the pink, orange, and blue strings on the right side.

Step 31

Step 25 : How to Make Friendship Bracelets Tutorial with Pictures

After we have done all the right-side knotting, take the yellow string down off the left-side pin and then double knot the right-side yellow string over the left-side yellow string.

Step 32

Step 26 : How to Make Friendship Bracelets Tutorial with Pictures

Now put the right side strings back on the pin.

Fan out the left side strings…and then double knot the pink strings over the orange, blue, and yellow strings. Then put all of these strings back on the pin.

Take the right side strings down off of the pin and fan them out. Then double knot the pink strings over all of the strings.

Then double knot the 2  pink strings together in the center.

Step 33

Step 27 : How to Make Friendship Bracelets Tutorial with Pictures

Do the same thing with the orange strings.

Step 29

Step 28 : How to Make Friendship Bracelets Tutorial with Pictures

Now this is what your string will look like with all four colors done once.

Now just repeat again and again and again until you are sick of it.

Finished Bracelet

How to Make V Shaped Arrows Friendship Bracelets Illustrated Instructions

When you have gotten enough done to cover most of the front of the bracelet. You can then…braid the left side of the strings….the braid the right side of the strings … so you have only 2 strings now. Then you can tie the 2 strings around the loop for a closed clasped- bracelet.

I hope that you enjoyed this craft!!

You Might Enjoy Our Other Friendship Bracelets Crafts Too

Technorati Tags: , , , , , , , , , , , , , ,

How to Make Juggling Balls & Stress Balls from Balloons and Lentils in Easy Craft Activity

Today we will show you how to make your very own juggling balls….with balloons and lentils. This is a fun family activity to do with your sisters and brothers and parents. These juggling balls feel a LOT like stress balls, so they can also be used for that purpose as well. The step by step instructions can be found below.

How to Make Juggling Balls from Balloons and Lentils in Easy Craft Activity

How to Make Juggling Balls & Stress Balls from Balloons and Lentils in Easy Craft Activity

Crafts Materials Needed

– Balloons

– Scissors

– Funnel or a Piece of Paper Rolled up Like a Funnel

– Lentils or Split Peas

Step 1

Step 1 : Making Juggling or Stress Balls in Easy Steps

Blow a balloon up half way. Keep it inflated for about 30 seconds.

Step 2

Step 2 : Making Juggling or Stress Balls in Easy Steps

Now deflate it.

[ad#ahc]

Step 3

Step 3 : Making Juggling or Stress Balls in Easy Steps

Use a funnel…but if you don’t have one…roll up a piece of paper so that it is bigger on one end and smaller on the other.

Step 4

Step 4 : Making Juggling or Stress Balls in Easy Steps

Put the smaller end of the funnel deep into the balloon.

Step 5

Step 5 : Making Juggling or Stress Balls in Easy Steps

Fill it up with lentils until it is about this full.

Step 6

Step 6 : Making Juggling or Stress Balls in Easy Steps

Now cut off the top of the balloon.

Step 7

Step 7 : Making Juggling or Stress Balls in Easy Steps

Take 2 more balloons and cut the ends off of those too.

Step 8

Step 8 : Making Juggling or Stress Balls in Easy Steps

Now stretch the first balloon over the filled balloon … cover the side that has a hole in it.

Step 9

Step 9 : Making Juggling or Stress Balls in Easy Steps

Now your balloon will look like this.

Step 10

How to Make Juggling Balls from Balloons and Lentils in Easy Craft Activity

Now cover your balloon with the last, third, balloon.

Now make 2 more balloons the same exact way and juggle your heart out. I hope that you have fun.

Check out our video on How to Make Juggling Balls

Technorati Tags: , , , , , , , , , , , , ,

How to Make Simple Pinball Machine with Recycled Materials Crafts Project for Kids

This is a super cool crafts activity that we are going to do today. If you love playing pinball, then you will love making this simple machine…a pinball machine. Just recycle some old stuff from around your house … such as a cardboard box, pins, paper towel roll, a marble, and you will have your own handmade game / toy to play with.

You Might Also Enjoy : Making Pinball Toy from VHS Tape

How to Make Simple Pinball Machine with Recycled Materials Crafts Project for Kids

How to Make Simple Pinball Machine with Recycled Materials Crafts Project for Kids

Crafts Materials Needed

– Cardboard Box

– Extra Piece of Cardboard

– Some Thin Cardboard…Like from a Cereal Box

– Tape

– Glue

– Rubber Bands

– Strong Cardboard Tube (about 6 inches long)

– Pencil

– If you want to decorate it – decorative paper

– ruler

– marble or ball-like candy

Optional Materials to Use for Obstacles

– pins, straws, bottle caps, bottle, paper fastener, other household items (use your creativity)

Step 1

Step 1 : Making Cardboard Box Pinball Machines

Take your cardboard tube and trace 2 circles with it. Then cut them out about 1/4 inch smaller than the circle you traced.

Step 2 : Making Cardboard Box Pinball Machines

Cut Out these two circles….like I said, a bit smaller than you had traced them at.

Step 2

Step 3 : Making Cardboard Box Pinball Machines

Glue these 2 circles together.

[ad#ahc]

Step 3

Step 4 : Making Cardboard Box Pinball Machines

Tape these circles to the eraser-side of the pencil. Tape it VERY well by taping it around the base of the pencil too.

Step 4

Step 5 : Making Cardboard Box Pinball Machines

Now take out 4 rubber bands, any size…just make sure that they are sturdy rubber bands. You are going to tie them all together by following the 3 steps above. Just put one end of a rubber band through another rubber band (#1) and then pull this rubber band through itself (#2) and then pull (#3).

Step 5.5 : Making Cardboard Box Pinball Machines

Link all 4 of these rubber bands together using this method.

Step 5

Step 6 : Making Cardboard Box Pinball Machines

Now take the cardboard tube out and poke a hole through it with a scissor 1 inch from the bottom. Do the same thing on the other side of the cardboard tube.

Step 6.1 : Making Cardboard Box Pinball Machines

Just showing you that I poked the hold in it with a scissor. Do the same thing on the opposite side.

Step 6

Step 6.2 : Making Cardboard Box Pinball Machines

Now pull the rubber bands through both ends of the tube so that it looks like the picture above.

Step 7

Step 7 : Construction Pinball Simple Machine Activity for Children

Now tie very loose knots on both ends of the rubber band chain…one on either end of the cardboard tube.

Step 8

Step 8 : Construction Pinball Simple Machine Activity for Children

Now pull the pencil-circles piece through the cardboard tube, making sure to avoid the rubber bands. While the cardboard circles are at the top… pull 2 rubber band loops over the pencil. Do one on the left and then the one on the right.

Step 9

Step 9 : Construction Pinball Simple Machine Activity for Children

Cut 2 inches out of the box on the bottom right. I decorated my box with cool paper, but you don’t need to.

Step 10

Step 10 : Construction Pinball Simple Machine Activity for Children

Cut out a piece of cardboard that is about half the length of the pinball box. The width of the cardboard should be about an inch higher than the height of the pinball box. Draw a line where the height of the pinball box would be, as I did above. Then cut slits in the cardboard like I did above, in the portion of the cardboard to the right of this line.

Step 10.1 : Construction Pinball Simple Machine Activity for Children

Now bend on this line.

Step 10.2 : Construction Pinball Simple Machine Activity for Children

Glue it on the left side of the opening in the box. Glue at bottom and also glue it to the side of the box, where it touches the pinball box.

Step 11

Step 11 : Construction Pinball Simple Machine Activity for Children

Cut a thin piece of cardboard that is about 1 and a half times the width of the pinball box. It should be the same height of your pinball box. Now cut slits on the right and left side of this cardboard.

Step 11.2 : Construction Pinball Simple Machine Activity for Children

Now paste it to both sides of the box.

Step 12

Step 12 : Construction Pinball Simple Machine Activity for Children

Cut another piece of cardboard that is about 1 and a half times the width of your pinball box….it should be about 2 to 2 and a half inches high. Now cut slits all down the bottom of this piece of cardboard.

Step 712.1 : Construction Pinball Simple Machine Activity for Children

Turn the pinball box over. Now bend and fold the cardboard piece that you just cut to look like the picture above. This is going to be the stand for your pinball machine so that it is tilted. Glue this stand on the bottom of the box (at the back of the box).

Step 13

Step 13 : Construction Pinball Simple Machine Activity for Children

Measure about 3/4 inches up the bottom of the pinball box. Cut a hole half way up the height of the box, at the point your measured 3/4 inches.  Then also cut a hole on the barrier.

UNTIE THE LOOSE KNOTS IN THE RUBBER BANDS ON EITHER SIDE OF THE CARDBOARD TUBE!!

Then put the cardboard tube cannon into the 2 inches gap in the box….and then put the rubber bands through each of the holes.

Double knot on both sides.

Step 14

Cut hole and put notches in the side of the box

So first make your flipper with cardboard or Popsicle sticks and. I taped mine with red duct tape to make it look nicer.

We are going to cut a hole in the pinball box to put the flipper in. Use your judgment, depending on your box, on where you want to place the flipper.

Then Make a notch at the top and bottom of this hole to fit the flipper in securely.

Step 14 : Construction Pinball Simple Machine Activity for Children

I put the flipper in. Make sure that it works properly. If this doesn’t work properly for you…use a paper fastener. Directions are in this tutorial that I found on the net.

Step 15

Step 15.1 : Construction Pinball Simple Machine Activity for Children

Cut a long and thin strip of cardboard.

how to make an envelope fold

Fan Fold it…Fold forwards, then backwards, then forwards, then backwards….

Step 15.2 : Construction Pinball Simple Machine Activity for Children

Until it looks like this.

Step 15 : Construction Pinball Simple Machine Activity for Children

Now touch the first strip to the last strip and it turns into a star. Glue it together. To hook it to your pinball machine…use a sewing pin / doll pin and stick it in the center of it. Now when a marble hits it, it spins.

Step 16

Step 16 : Construction Pinball Simple Machine Activity for Children

To make some good barriers, use doll pins or sewing pins and stick them just far enough from each other that the marble will fit through, but make it move in different directions.

Step 17

Step 17 : Construction Pinball Simple Machine Activity for Children

Cut a 2 inch piece of cardboard out and cut strips out like I did above.

Step 17.1 : Construction Pinball Simple Machine Activity for Children

Now fold and glue it at the bottom of the pinball box, like I did in the picture.

Step 17.2 : Construction Pinball Simple Machine Activity for Children

Paste another one like the previous one…do a 3rd or 4th one too if you want to.

Step 18

Step 17.3 : Construction Pinball Simple Machine Activity for Children

I put a piece of decorative paper in each half circle.

Step 19

Step 17.4 : Construction Pinball Simple Machine Activity for Children

Put a score in each of them too. These don’t have to be just at the bottom…they can be anywhere on the pinball board.

Use Your Creativity to Make More Obstacles

How to Make Simple Pinball Machine with Recycled Materials Crafts Project for Kids

I didn’t quite finish it because this is where YOUR creativity comes in. We can post your ideas here.

You Might Also Enjoy Our Other Crafts Tutorial : Making Pinball Toy from VHS Tape

I found a few other Pinball Making Tutorials Online that will give you some great ideas. Read them below

How to Make a Simple Pinball Machine

FETCH! Pinball Wizard

Design Your Own Pinball Machine.

Use Your Creativity to Make More Obstacles

Fire the marble out of the cannon / plunger by lowering the pencil a bit, putting the marble in the top of the cannon, and then pull the pencil down, and let go. Now hit the flipper to keep the ball up in the air longer. Write the number of points that you get with each turn down on a piece of paper. However…make your pinball machine the way that you WANT it to be…no the way that I want mine to be like.

Have fun!

Technorati Tags: , , , , , , , , , , , , ,

How to Make Cardboard Tabletop Billiards Pool Table Craft for Kids

So what if you can’t afford a big expensive pool table to play billiards with. Today we will show you how to make a tabletop billiards game that you can make with a recycled cardboard box and some checkers (or bottle caps). If you can flick with your finger, than you will be able to play this game. Instructions for building your own cardboard pool table is illustrated below.

How to Make a Toy Pool Table with Checkers and Cardboard

How to Make Cardboard Tabletop Billiards Pool Table Craft for Kids

Crafts Materials Needed

– A cardboard box, preferably with low sides (but you can also just cut it to be a low box.  (About 30 inches by 20 inches would be good)

– Checkers or milk container crafts … you need 21 caps or checkers.

– felt or paint

– A paper or plastic cup

– tape

– glue

– scissors

– tape

Step 1

Step 1 : Making Cardboard Billiards Pool Table Games Crafts Activity

If you don’t have a low-sides box then cut it down so the sides are low.

Step 2

[ad#ahc]

Step 2 : Making Cardboard Billiards Pool Table Games Crafts Activity

To make this look more like a pool table, you want red or green paint or felt on the bottom of the table. This is just decorative, so if you don’t have either felt or paint, then pass by this step.

Step 3

Step 3 : Making Cardboard Billiards Pool Table Games Crafts Activity

When paint or glue is dry, then you can move on to this step. Take the cut and trace out circles on all 4 corners of the box. Cut out these circles on all 4 sides.

Step 4

Step 4 : Making Cardboard Billiards Pool Table Games Crafts Activity

If your Mom has any old stockings, ask her if you can use them for this project. As a last resort, you can use socks, but stockings are preferable. Cut the feet off of 4 feet on either stockings or socks.

Step 5

Step 5 : Making Cardboard Billiards Pool Table Games Crafts Activity

Turn the box over and paste the stockings around the circles..these will be the pool table’s pockets where the pieces will be caught.

Step 5

Step 6 : Making Cardboard Billiards Pool Table Games Crafts Activity

Now take very thin cardboard and cut a thin strip from it.

Step 6

Step 7 : Making Cardboard Billiards Pool Table Games Crafts Activity

Now wrap this thin cardboard around the third finger…this is your flicking finger. This will help you flick without it being painful. Don’t do it too tight or you will lose circulation in your finger.

Wrap clear tape all around this finger to keep it in place.

Step 7

Do you have checkers? If the answer is yes…then make sure that you have 10 black checkers and 10 red checkers. You also need one piece that is a different color. You can paint that other piece another color or take a white piece of paper and tape or glue it to the extra piece.

If you don’t have checkers, than you will need 21 milk carton caps.  You need 10 caps in one color, 10 in another color, and one cap that is another color. In the example picture below, we have 10 black, 10 red, and 1 white. You can use paint or buy containers with specific color caps, though this could take forever.

Step 8

How to Make a Toy Pool Table with Checkers and Cardboard

The above picture illustrates that way that you set up the table. You put the one white piece in the center of the board and then you put the other pieces the way that you see above.

How to Play Flicking Finger Billiards

Each Player or Team Has a Color. The Team or Player who Has Chosen to be black, goes first.

The player with a black checker, tries to flick it against a red checker to get it into one of the 4 pockets. If he DOES get a red checker into a corner pocket, then he gets to go again. If he does not get a red checker into a pocket, then it is the red checker player’s turn. The player with a red checker, needs to try to flick his red checker into a black checker to make the black checker go into a pocket.

The players should try to avoid hitting the white checker into a pocket. If either player flicks the white checker into a pocket, then he will need to take that white checker  AND one of his checkers out of the pocket and back onto the table.

The first player to flick all of the other players checkers into the pockets wins.

Technorati Tags: , , , , , , , , , ,

How to Make Pretty Earrings or Ear studs Hearts for Valentines Day Craft

Learn how to make these adorable polymer clay stud hearts (aka heart earrings). You can give these stud hearts to your Mom, Grandma, friends, etc to show them how much you care about them…especially for Valentine’s Day, Mother’s day, or a birthday. But, because we’ll use polymer clay (oven-hardening) you’ll need a little help from an adult. This is an easy to do step by step tutorial offered by Laura from Dacian Moon Handmade

Here are Even More Valentines Day Crafts Ideas

How to Make Pretty Earrings or Ear studs Hearts for Valentine's Day Craft

How to Make Pretty Earrings or Ear studs Hearts for Valentine’s Day Craft

CRAFTS MATERIALS NEEDED:

– toothpick
– red polymer clay (I placed the toothpick beside it to see how much polymer clay you need)
– cutter
– 2 flat earstuds
– 2 earnuts
– craft glue
– baking paper
– baking tray

Step 1.

Polymer clay has to be conditioned prior to use. Conditioning in this case means thorough mixing. To make conditioning easier, start with warming up your clay. The gentlest way of doing it is to carry the clay in your pocket for a while. You are ready to start conditioning your clay once it feels pliable. To condition polymer clay by hand, simply mix it and squish it with your fingers. You may want to roll it into a log between your palms, fold it in half, and then roll again.

The smaller the piece of clay you are conditioning, the faster it will soften up.

Step 2.
Make a ball with it.

[ad#ahc]
Step 3.
Cut the ball in half.

Like that.

Step 4.
Squish gently between two fingers to make the lower part of the heart.

Step 5.
On the upper part, use the toothpick to shape it…

… like this.

Step 6.
Repeat the step 4 and 5 for the other half of polymer clay ball.

Step 7.
This is the moment when you need help.
Place the hearts on a baking paper in a baking tray. Bake them accordingly to the instructions on the polymer clay package (they depend on the brand you use: fimo, cernit, sculpey…, but usually is one half of hour at 230 F or 110 C)

Step 8.
Let it cool down.

Step 9.
Apply a layer of glue on the back side of the hearts and place the earstuds in the middle.

After the glue is dry, you can wear the earrings and be special on Valentine’s Day 😉

Here are Even More Valentines Day Crafts Ideas

Technorati Tags: , , , , , , , , , , , , , , , , ,

How to Make a Polymer Clay Heart Keychain Crafts Idea for Kids on Valentines Day

Today we will show you how to make this cool polymer clay heart keychain…a perfect gift to give to somebody you love or a good friend on Valentine’s day or to Mom on Mother’s Day or for a birthday. This polymer clay key chain is a cute heart adorned with flowers … perfect to decorate your phone, backpack, purse, etc.Below you will find the  step by step tutorial offered by Laura from Dacian Moon Handmade. Just to let you know…because we’ll use oven-hardening polymer clay you will need a little help from an adult.

Here are Even More Valentines Day Crafts Ideas

How to Make a Polymer Clay Heart Keychain Crafts Idea for Kids on Valentines Day

How to Make a Polymer Clay Heart Key Chain Crafts Idea for Kids on Valentines Day

CRAFTS MATERIALS NEEDED

– toothpick
– red and white polymer clay (I placed the toothpick beside it to see how much polymer clay you need)
– roll (you can use anything tubular – I use a recipient for Vitamines 😀 )
– baking paper
– baking tray
– keychain cord
– 1 jumpring

Step 1.

Condition red polymer clay by hand, simply mix it and squish it with your fingers. You may want to roll it into a log between your palms, fold it in half, and then roll again.

Step 2.

Make a ball of it and flatten it.

[ad#ahc]

Step 3.

Gently squish one part, to form the lower part of the heart.

Step 4.

Use the toothpick to shape the upper part of the heart.

This is the heart 🙂

Step 5.

Place it on a piece of baking paper.

Use the toothpick again to make a hole in the upper left side.

Take care that the toothpick goes through the heart and get out on the other part.

Step 6.

Condition the white polymer clay too.

Step 7.

Make a small roll of white…

… and place it on the heart. Make a crease on it to fix it on the heart, like in the picture:

Add three more white petals.

Step 8.

Make a tiny white ball…

… and place it in the middle of the petals.

Step 9.

If you like, place two more petals on the opposite corner, for balance.

Step 10.

Now you’ll need the help of an adult.
Place the heart (with it’s piece of baking paper) on the baking tray, and bake it accordingly to the instructions on the polymer clay package (they depend on the brand you use: fimo, cernit, sculpey…, but usually is one half of hour at 230 F or 110 C)

Step 11.

Let it cool down.

Step 12.

Open the jumpring (I use a pliers for that)…

… put it through the hole that you made in the heart…

And through the keychain cord base.

Step 13.

Close the jumpring and the keychain is ready 🙂

Here are Even More Valentines Day Crafts Ideas

Technorati Tags: , , , , , , , , , , , , , , , ,

How to Make a Magnetic Travel Board Games Set with Altoids Tins Craft for Kids

Today I will show you how to make a really cool travel board games kit out of magnets, paper and an altoids tin. This is a great travel game board system that you can stick in your pocket to bring to school with you to play on the bus, in the cafeteria, or what ever. You could even bring it in the car with you to play with your sisters and brothers with. Or you can just play solo since there are 2 different solitaire games to play.

How to Make a Magnetic Travel Board Games Set with Altoids Tins Craft for Kids

How to Make a Magnetic Travel Board Games Set with Altoids Tins Craft for Kids

Crafts Materials Needed

– Altoids Tin
– Magnetic Tape, Magnetic Sheets, or Old Unwanted Fridge Magnets
– Paper
– Paste / Glue
– Scissors

First Print Out These 2 Pages

Today I will show you how to make a really cool travel board games kit out of magnets, paper and an altoids tin.
Click on Image Above to Print Out Game Boards Inserts
Today I will show you how to make a really cool travel board games kit out of magnets, paper and an altoids tin.
Click on Image Above to Print Out Game Pieces

How to Make a Magnetic Travel Board Games Set with Altoids Tins Craft for Kids

See this altoids tin…soon it will be your favorite game to take with you in your pocket.

Step 2

Making Magnetic Chess Checkers and Dots and Squares Game Boards

Cut out the game boards and just place the ones that you want to use within the tin. You don’t even need to glue them in…they will just stay inserted.

[ad#ahc]

Step 3

Making a Backgammon Game Boards Kids with Magnets

If you want to use backgammon, then glue both of them to the back of the tin…as I did in the picture above.

Step 4

Making Magnetic Chess Pieces

Cut out the game pieces and glue them to the magnets.  For the Dots and Square game…you can just cut out thin slits of magnet to use as the lines.

Step 5

Backammon, Pegs Solitaire, Pyramid Solitaire, Dots and Squares Checkers and Chess Games

Above you can see all of the game inserts that come with this craft.

Here are Instructions on How to Play the Following Games:

Peg Solitaire Cross

Peg Solitaire Pyramid

Dots and Squares

Checkers

Chess

Backgammon (needs dice)

Reversi

Tic Tac Toe

Technorati Tags: , , , , , , , , , , , , , ,

Make a Groundhogs Day Board Game Crafts Idea for Kids

This activity starts as a coloring page, then a craft, and finally a board game to play with friends or family.  We have provided you with two templates to print out: a game board and a sheet of six movers.  However, if you do not have a printer, or do not have permission to use one, you can get two sheets of plain white paper and make your own.

Here are More Groundhogs Day Crafts

Make a Groundhogs Day Board Game Crafts Idea for Kids

Make a Groundhogs Day Board Game Crafts Idea for Kids

Crafts Materials Needed:

  • Paper
  • Printer
  • Colored pencils, crayons or washable markers
  • Index cards
  • Tape
  • Safety scissors
  • Pen or pencil
  • Imagination

To start with print out the two pages provided, or draw your own.

Groundhog Gameboard
Groundhog Movers

STEP 1 – PREPARE THE BOARD

Color in the groundhog with your colored pencils, crayons, or washable markers.  I used colored pencils to get the details.  Then you can decide which side is start and which is finish, mark those.  I put START and FINISH, but you could also put WINTER and SPRING.

Add special instructions to spaces, if you want to make the game a little harder.  I put “See shadow.  Go back 3 spaces” and “No shadow.  Go forward 2 spaces” on mine.  Make sure you don’t put too many, and that you don’t put one where another space will end.  I accidentally put “Go back 3 spaces” 3 spaces in front of a “Go forward” space, so I had to change it to “Go back 2 spaces”.  If you make a mistake like this, it’s very easily fixed.

[ad#ahc]

STEP 2 – MAKE THE PLAYING PIECES

First you will pick 6 different colors and color your groundhogs.  Make sure the colors are different enough you won’t get confused during game play.

Now, cut them apart leaving each pair together.  Once you have 6 pieces of paper, fold them in half so the groundhogs of the same color are both facing out.  You can hold it up towards a light to make sure the holes that the groundhogs are popping out of line up.  Then, cut a flat bottom and up around the ground hog.  Make sure you leave the two sides attaches by the heads.  I have included a picture of the pieces at various stages.

Now, take an index card and fold it lengthwise.  Cut along the fold and discard one half.  Cut the other into 3/4″ strips, you will have a little left over that you can also discard.  Now take a 1 1/2″ length of tape and lay it on your work surface, sticky side up.  Place a strip of index card on it, and tape it to the bottom of a playing piece.  Do this for each piece.  Again, I have including a picture with various stages.

STEP 3 – MAKE CARDS

If you are short on time you can grab a die from another board game, just make sure you have permission first.   If you want to play the game following the rules below then you will need 8 index cards.  Cut each one on half the short way and write Groundhog Day on the blank side.  You should now have 16 cards that look like this:

Now flip them over to the lined side and write down how many moves each card is worth.  You will need 4 each of 1, 2, 3 and 4.  Mine has the number at the top and instructions underneath, but you can make yours however you wish.

STEP 4 – PLAY THE GAME

  1. Mix the numbered cards and lay them face down to the left of the board.
  2. Place all colored playing pieces in front of the “start” space.
  3. Youngest player (or whoever made the game) goes first.  They pick the top card from the pile, move the amount of spaces stated, and discard face up to the right of the board.
  4. Play moves clockwise around the board.
  5. If a player lands on a special space they must follow all instructions on that space.
  6. The goal is to be the first player to reach the end of the game.

Here are More Groundhogs Day Crafts

Technorati Tags: , , , , , , , , , ,