How to make a Pet Rock

Pet Rocks became popular in the 1970’s.  It would be our equivalent of the virtual pet.  It really doesn’t do much.  It sits and keeps you company.  But, one thing is for sure…. they are always super cute.  Today I’m going to show you how to make your very own Pet Rock.  You don’t have to follow the craft word-for-word if you don’t want to…. feel free to use your own imagination to make your Pet Rock however you see fit.

Laura from Dacian Moon Handmade will show you how to make your Pet Rock.


CRAFT MATERIALS NEEDED:

– stone
– acrylic paints
– paintbrush
– a button
– two plastic antennas (or anything you want to use – you can make ears, horns, hair …)
– craft glue


Step 1

Wash the stone and wait for it to dry… That way the paint will adhere better.

Then add glue where you want to place decorations.

Place button in the middle for the snout.

Take the antennas…

… and place them on their place.


[ad#ahc]

Step 2

Let the glue dry.


Step 3

Choose the color you want your pet to be. I went with blue.

Carefully cover all with paint – including the antennas and snout…

… like that.


Step 4

Next, paint its eyes and make him blush.

I use night glow paint for the eyes so I can see him in the dark  too.

There you have it.  Easy Peasy Lemon Squeezy.  How did you decide to make your Pet Rock?  Let me know in the comments below.  Don’t forget to add your picture in the comment, so I can see how your Pet Rock turned out.

Technorati Tags: , , , , , , , , ,

How to Make a “Thank You” Bookmark for Thanksgiving

Thanksgiving is just around the corner.  Thanksgiving is a day to give thanks for all that you have… for all the love and support you have around you.  What better way to show your loved ones you are thankful for them than to give them a gift you made yourself.  Today I’m going to show you how to make a “Thank You” Bookmark perfect for giving as a gift for Thanksgiving.

Check out our other Thanksgiving Crafts and Bookmark Crafts.

Image172


Materials Needed

Thick White Paper

Colored Paper to Make Letters (you could also use stickers)

Glue

Scissors

Thread – Different Colors ( I used 6 stranded embroidery thread)

Hole Punch

Pencil

Image173


Step 1

Cut out letters in different colors (or use stickers, or print out letters and cut them out)

Image151


[ad#ahc]

Step 2

Arrange them in a row and glue to the white paper as shown

Image152


Step 3

Draw a line around the letters according to the shape of the letters as shown

Image153


Step 4

On the top, make a semi circle and draw as shown

Image154


Step 5

Cut along the line and punch a hole in the top.

Image156


Step 6

Take threads of different colors

Image162


Step 7

Cut them out into pieces 6 inches long, and fold them in the middle as shown

Image165


Step 8

Push the folded end through the punched hole on top of the bookmark as shown

Image166


Step 9

Pull the loose ends of the threads up and put them into the loop that is formed as shown.

Image169


Step 10

Pull tightly, till it looks like this.

Image172

And, that’s it.  It is a simple craft, but it will go over big as a gift.  So, whose the lucky person who is going to get this gift from you?

Technorati Tags: , , , , , , , , , , ,

How to Make Woven Paper Bracelets

If you love making bracelets, but you are sick of making the same old bracelets all the time…. then I have the bracelet craft for you.  I am going to show you how to make woven paper bracelets that you can make for yourself or share with friends.  And, don’t worry… they are stronger than you might think.  These paper bracelets are woven with many, many different folds causing the bracelets to be quite strong.  So, let’s get started.

Check out our other Bracelet Crafts and Jewelry Crafts.

How to Make Woven Paper Bracelets


Materials Needed

2 Different Color Sheets of Paper

Tape or Glue

Ribbon

Scissors


Step 1

Cut 4 strips of paper that are about 10 inches long and a 1/4 inch wide

Cut 4 strips of paper that are about 10 inches long and a 1/4 inch wide… we used two different colors.

[ad#ahc]

Step 2

Tape or glue 2 strips end to end twice

Tape or glue 2 strips end to end twice…. making the strips 20 inches long.


Step 3

Place one strip horizontal and the other in a letter 'V' around the first strip.

Place one strip horizontal and the other in a letter ‘V’ around the first strip.  Number them 1, 2, 3 and 4.


Step 4

Fold #4 over #3, so it is parallel with #2.

Fold #4 over #3, so it is parallel with #2.  (Like a number 11)


Step 5

Fold #1 behind #2 so it is parallel with #3.

Fold #1 behind #2 so it is parallel with #3.


Step 6

Now, push #1 in front of #4.

Now, push #1 in front of #4.


Step 7

Now, fold #3 over #1 so it is parallel with #2 and #4.

Now, fold #3 over #1 so it is parallel with #2 and #4.


Step 8

Now, fold #2 behind #4 and over #3 so it is parallel with #1.

Now, fold #2 behind #4 and over #3 so it is parallel with #1.


Step 9

Push #1 in front of #4.

Push #1 in front of #4.


Step 10

Fold #3 over #1 so it is parallel with #2 and #4.

Fold #3 over #1 so it is parallel with #2 and #4.


Step 11

Fold #2 behind #4 and over #3 so it is parallel with #1.

Fold #2 behind #4 and over #3 so it is parallel with #1.


Step 12

Fold #1 over #2.

Fold #1 over #2.


Step 13

Fold #4 under #3 and over #1.

Fold #4 under #3 and over #1.


Step 14

Continue this process until there is no more paper

Continue this process until there is no more paper, then… tape loose end together.


Step 15

Put ribbon through spaces to tie bracelet together.

Put ribbon through spaces to tie bracelet together.

Wow, doesn’t it look beautiful?!  Now, the question is…. are you going to keep it for yourself or give it to a friend?  Hmmmmm…. what are you going to do?

Technorati Tags: , , , , , , , ,

How to Make a Model Magic Yo-Yo

Yo-yo’s have been a popular toy since the 1920’s.  Kid’s love them now just as much as they loved them then.  When I was a kid I use to love playing with Yo-yo’s.  I actually got pretty good at it.  Well, today I’m going to show you how to make your very own yo-yo.  Made from Model Magic Clay and string you will be playing with your homemade Yo-yo in no time.

Check out our other Clay & Sculpting Crafts Ideas

How to Make a Model Magic Yo-Yo


Materials Needed

Model Magic Clay

Dull Butter Knife

2 Feet of String


Step 1

Roll Model Magic clay into a ball within the palms of your hand.

Roll Model Magic clay into a ball within the palms of your hand.

[ad#ahc]

Step 2

Use a dull butter knife to cut two lines about a pinkie's width apart.

Use a dull butter knife to cut two lines about a pinkie’s width apart.  Dig out the clay… leave center intact.


Step 3

Let dry and then... Tie 2 feet of string onto center of the yo-yo.

Let dry and then… Tie 2 feet of string onto center of the yo-yo.


Step 4

Go play with your yo-yo.

That’s it…. you did it.  You just made a model magic yo-yo yourself.  Good for you!!  Now, go play with your yo-yo.

Technorati Tags: , , , , , , ,

How to Make a No-Sew Water Bottle Holder

I have a very useful craft for you today.  I’m going to show you how to make a No-Sew Water Bottle Holder.  No more holding on to a wet and cold water bottle with your bare hands.  The water bottle cover-up will keep your hands nice and warm while keeping your water bottle cold.  Let’s do it.

Check out our other No-Sew Crafts.

How to Make a No-Sew Water Bottle Holder

Materials Needed

2 Different Color Socks

Water Bottle

More than 48″ of String

Beads

Scissors


Step 1

Cut cuffs off 2 socks in different colors.

Cut cuffs off 2 socks in different colors.

[ad#ahc]

Step 2

Place one cuff over bottle up to the very top.

Place one cuff over bottle up to the very top.  Tie closed with 48 inch long string.


Step 3

Cut slits at the top of the socks like in image above.

Cut slits at the top of the socks like in image above.  Pull string through slits.


Step 4

Place beads on string and then tie strings closed.

Place beads on string and then tie strings closed.


Step 5

Turn second sock inside out.

Turn second sock inside out.


Step 6

Tie cut end closed with string.

Tie cut end closed with string.  Turn right side out.


Step 7

Now your item looks like this.

Now your item looks like this.


Step 8

Pull second sock over first sock.

Pull second sock over first sock.


Finished water bottle holder

There you have it.  You just finished your No-Sew Water Bottle Holder out of socks.  Now grab your water bottle with holder and go off and have some fun.

Technorati Tags: , , , , , , , ,

How to Make a Springy Paper Bracelet

I have a fun bracelet craft for you…. and the only materials you need for it can be found in your home.  I am going to show you how to make a springy paper bracelet made from colorful paper.  And, don’t think just because this bracelet is made out of paper that it is weak.  On the contrary, it is very strong.  The bracelet is made up of many, many folds in the paper making it very strong.  So, let’s get started.

Check out our other Bracelet Crafts and Jewelry Crafts.

How to Make a Springy Paper Bracelet


Materials Needed

2 Different Color Sheets of Paper

Glue or Tape

Scissors


Step 1

Cut 4 slits of paper from each color paper.

Cut 4 slits of paper from each color paper.  If you are using longer sheets of paper then just cut 3 slits of paper from each color paper.

[ad#ahc]

Step 2

Glue or tape strips together end to end.

Glue or tape strips together end to end.


Step 3

Now, take the 2 different color strips of paper and glue or tape together at a 90 degree angle... like a letter "L".

Now, take the 2 different color strips of paper and glue or tape together at a 90 degree angle… like a letter “L”.


Step 4

Pull strip #1 over strip #2 and fold it over.

Pull strip #1 over strip #2 and fold it over.


Step 5

Now orange (#1) is folded over blue (#2).

Now orange (#1) is folded over blue (#2).


Step 6

Pull blue (#2) and fold #2 over orange (#1).

Pull blue (#2) and fold #2 over orange (#1).


Step 7

Now, blue (#2) is folded over orange (#1).

Now, blue (#2) is folded over orange (#1).


Step 8

Fold orange over blue (1 over 2).

Fold orange over blue (1 over 2).


Step 9

This is what it should look like with orange (#1) folded over blue (#2).

This is what it should look like with orange (#1) folded over blue (#2).


Step 10

Fold blue over orange (#2 over #1).

Fold blue over orange (#2 over #1).


Finished springy paper bracelet

Continue folding the bracelet in this way until it is the desired length you want.  Cut and either glue or tape.  That’s it.  You have a springy paper bracelet.  You can even make a necklace by making a longer one.  Keep it for yourself or give it to a friend.  They’ll love it.


Technorati Tags: , , , , , , , , , ,

Ideas for Easy, Inexpensive & Crafty Table Decorations for Thanksgiving

Ideas for Crafty Table Decorations for Thanksgiving

Thanksgiving is coming quickly and every year I’m amazed at the clever ideas people have for decorating their table tops.  I was roaming the internet for interesting ideas and I came across quite a few.   I was intrigued not only by the creativity, but also the fact that many of them were quite inexpensive to do.  I wanted to share a few ideas that I found easy and inexpensive…. so, without further ado…..

Ideas for Easy, Inexpensive & Crafty Table Decorations for Thanksgiving

(1) Gourd Gobblers

Gourd Gobbler Table Decoration

Made from pumpkins these turkey’s look amazing and festive.  I found this creative table decoration over at the Martha Stewart site and I was more than impressed.  It would look great on any table.


(2)  Pumpkin Vases

Pumpkin vase table decoration

Here is a simple and inexpensive Thanksgiving centerpiece idea.  Just gut out a pumpkin and use it as a vase.  I found this idea over at Country Living and it’s a good one.  I’m sure you would get a lot of compliments on it during your Thanksgiving feast.

[ad#ahc]

(3) Goofy Gourd Gang

Goofy Gourd Gang

Here is a great centerpiece if you are doing a separate kids’ table from the adult table.  The kids won’t mind sitting at the kids’ table if this is what it looks like.  ShelterPop shows you how to make these Thanksgiving items step by step.  This is a creative and inexpensive way to decorate the table…. gotta love that.


(4) “Thanks” Table Setting

Thanks table setting

I found this table decor over at Create.Love.Grow and I had to include this table decor.  She writes how she used things from around her house and it cost her $0 to make.  Gotta love that!! This will look great as a Centerpiece for Thanksgiving.


(5)  Pumpkin Tree Tabletop Decoration

Pumpkin tree tabletop decoration

Isn’t this beautiful?  I love this centerpiece and Better Homes and Gardens explained how easy it is to make this wonderful centerpiece.  My favorite part of this centerpiece are the small pumpkins hanging from the twigs… love it!!


(6) Vase Centerpieces

Vase Centerpieces

I love the color in this centerpiece.  They simply filled clear vases with colorful dried legumes.  Epicurious explains that this Thanksgiving centerpiece is so easy that instead of concentrating on the centerpiece you can use that energy to concentrate on making the Thanksgiving feast.


(7)  Fruitfully Fabulous Centerpiece

Fruitfully Fabulous Centerpiece

Here is a simply, but crafty centerpiece.  It’s another easy, but goodie Thanksgiving centerpiece.  Good Housekeeping shows us how you can easily make this Thanksgiving centerpiece in no time.  Simply dry some sliced citrus food and hot glue them into a band around candles.   It’s just lovely.


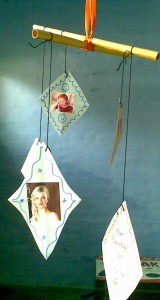
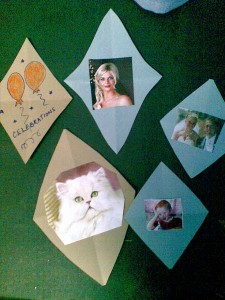
(8) Family Tree Centerpiece

Family Tree Centerpiece

What an original idea…. I think it’s just awesome!!  Simply, hang family photos from a table top potted plant and you have an amazing centerpiece for Thanksgiving.  Midwest Living came up with this idea and I think it’s a great idea.  It will be quite the conversation piece.


(9) The Kid’s Table

The Kids Table

As a kid I always hated sitting at the kids’ Table for Thanksgiving.  I felt like I was missing out on all the fun at the adult’s table.  But, I wouldn’t have been so sad if I had a cool Thanksgiving Kid’s Table like this one.  Frog Prince Paperie shows you how to put together this amazing kids’ table that all children are sure to love.


(10) Cranberry Carnation Pyramid

Cranberry Carnation Pyramid

I just love the color in this centerpiece…. what a beautiful red.  I found this beauty over at AllYou and I’m so glad I did.  I might have to give this centerpiece a try this Thanksgiving holiday.  It’s made from carnations, cranberries and apples…. I imagine this centerpiece must smell delicious.

Technorati Tags: , , , , , , , , , , ,

How to Make a Thanksgiving Mobile

Thanksgiving is a time to remember how blessed we are to have such great family and friends.  Well, with that being said…. I have a creative way for you to remind yourself how thankful you are…. a Thanksgiving Mobile.  With pictures and your thankful thoughts you are sure to show everyone how blessed you truly are.  So, let’s get started.

Check out our other Thanksgiving Crafts.

Image141


Materials Needed

Thick Colored Paper

Markers

Thread

Ribbon

Scissors

Glue

Pictures of Family and Friends (you can use old photos or print outs)

Image131


Step 1

Cut out pieces of paper in different colored and sized diamonds as shown.

Image130

[ad#ahc]

Step 2

Stick pictures on one side. I’m also really thankful for the great times of celebrations I had this year with my family and friends, so I made a special diamond that says ” celebrations”.  You can also add some like these.

Image133


Step 3

On the other side of the diamond, write the name of the person and decorate as shown.

Image134


Step 4

Using a pencil in the center, roll some colored paper into 2 tight rolls as shown. Glue the ends and then, remove the pencil.

Image132


Step 5

Cross the two rolls at the center and tie them together as shown.

Image149


Step 6

Punch a hole on the top end of the diamond and tie a piece of thread. Attach the thread to the paper rolls as shown.

Image135


Step 7

Tie a piece of ribbon to the top of the paper rolls as shown right in the middle.

Image136


Step 8

Now, hang up your mobile.

Image141

What a unique craft, huh?!  No one will have a Thanksgiving craft like yours.  Your family and friends are sure to love it.  Where did you hang your Thanksgiving Mobile?  Let me know in the comments below.

Technorati Tags: , , , , , , , , , ,

How to Make Thanksgiving Place Cards

I have a great Thanksgiving craft for you that will be not only useful, but very memorable as well.  I am going to show you how to make Thanksgiving place cards.  But, not just ordinary place cards…. these are place cards that your guests at your Thanksgiving feast will write down what they are thankful for.  Keep the place cards as a keepsake for years to come.

Check out our other Thanksgiving Crafts.

How to Make Thanksgiving Place Cards


Materials Needed

Printer

Paper

Scissors

Crayons (if printing off black & white template)

Glue

Pen


Below are printable templates for this craft.  You can choose to print off  a colored template or the black and white version.

Click on template image to make larger and to print.

Printable color template for Thanksgiving place cards

Printable black & white template for Thanksgiving place cards


Step 1

Print out paper template.

Print out paper template.

[ad#ahc]

Step 2

Cut out the Pilgrims from template.

Cut out the Pilgrims from template.


Step 3

If you printed out the black and white template.... color it in.

If you printed out the black and white template…. color it in.


Step 4

Fold white paper in half and then cut it a bit smaller than width of the pilgrim cutout.

Fold white paper in half and then cut it a bit smaller than width of the pilgrim cutout.


Step 5

Glue the top of the back of the white folded paper to Pilgrim's hands.

Glue the top of the back of the white folded paper to Pilgrim’s hands.  Write a message at the top of the place cards…. such as, “I Give Thanks For…”, “I Thank God For…” or “I’m Thankful For…”.  Every guest at your Thanksgiving feast can write what they are thankful for.  You can save the cards as a keepsake.


Finished Thanksgiving Place Cards

Aren’t these Thanksgiving place cards fantastic?  I can almost guarantee that your Thanksgiving guests will love this idea.  Plus, you will have something to remember this Thanksgiving…. your “I’m thankful for” place cards.

Technorati Tags: , , , , , , , , , , , , , , ,

How to Play the Turkey Game – Turkey Printable

If you are looking for a cute game to occupy the kids during the Thanksgiving Holiday I have one for you.  It’s a Turkey printable that is actually a game too.  Simply print off for the kids and with just a few materials you should be good to go.  No more bored children during the Thanksgiving football games…. just let them play the Turkey game.

Check out our other Thanksgiving Crafts.

How to Play the Turkey Game – Turkey Printable


Materials Needed

Printer & Paper

Brown Construction Paper

Pen or Marker

Glue

Crayons

Scissors

[ad#ahc]

How To:

Print off the Turkey template below.  Click on the image to make larger and to print.

Print off the above Turkey Template

Cut out turkey then color.  Cut slits on broken lines around tail feathers.  Print letters on all feathers.  Paste turkey on brown piece of construction paper, being careful not to paste near the slits.  Cut extra feathers, crayon and print letter on each.  Mix the extra letters.  When they are slipped through the correct slit on the turkey, they spell GIVE THANKS.


Finished Turkey Printable

And, that’s it….  simple and fun.  Gotta love that!!  Enjoy playing the Turkey game.

Technorati Tags: , , , , , , , , , , , ,

How to Make a Log Cabin Paper Sculpture

For the past few days I have been showing you how to make different Thanksgiving crafts.  Well, today I’m going to continue with the Thanksgiving fun by showing you how to make a Log Cabin Paper Sculpture.  This is a fun craft and will show you how creative you can be.  Made from magazines or newspaper this is a clever craft perfect for the Thanksgiving season.

Check out our other Thanksgiving Crafts.

How to Make a Log Cabin Paper Sculpture


Materials Needed

Magazines or Newspaper

Glue, Tape or String

Pencil

Brown Paint (if wish to paint log cabin)

Scissors

Hole Punch (optional)

Paper Fasteners (optional)


Step 1

Cut off the two side margins and roll the page diagonally, using a pencil as a form to start the tube

Use colored pages from magazines (although you can use any paper you want…even newspaper which is easier to paint). These colored sheets create exciting patterns when rolled. Cut off the two side margins and roll the page diagonally, using a pencil as a form to start the tube. Hold the tube firmly with both hands. As you roll, the pencil will disappear. If you want to remove it before it disappears,then hold the tube with one hand and gently pull the pencil out, then continue to roll until you get to the end of the paper.

[ad#ahc]

Step 2

Hold the tube with one hand and with the other apply a dab of paste or a piece of scotch tape and your tube is complete.

Hold the tube with one hand and with the other apply a dab of paste or a piece of scotch tape and your tube is complete. Don’t be discouraged if your first tube does not roll evenly; with a few tries you can make an excellent tube. Should your pencil disappear in the excitement of rolling the tube, complete the process, then place the tube between both hands and roll back and forth. The twisting will release your pencil.

A good way to attach the tubes to each other is to flatten the ends and bend them to the desired angle… then attach with scotch tape.  Holes can also be punched in the tubes… use paper fasteners to hold them together.


Another way to attach tubes is with string.

Another way to attach two tubes together is to tie them together with string.


Tubes can be joined together by inserting one end of a tube into the opening of another and gently twisting them together.

Tubes can also be joined together by inserting one end of a tube into the opening of another and gently twisting them together.


Step 3

Keep attaching your tubes together to form your log cabin.

Keep attaching your tubes together to form your log cabin.  This isn’t one of those crafts that I tell you every single step to make the finished craft.  This one is meant to force you into using your own creativity.  Each log cabin should be different from other log cabins.  There are many ways to make a log cabin paper sculpture… What way will you make yours?

Technorati Tags: , , , , , , , , , ,

How to Make a Paper Doll House Table & Chairs

Today I’m going to show you how to make a Paper Doll House Table & Chairs perfect for any doll house.  The craft is easy to make…. perfect for a child of any age.  Simply print, cut and fold.  You can choose to print off the color templates or if you would rather color your table and chairs yourself all you need to do is print off the black and white templates.  The choice is yours.  So, let’s get started.

Check out some of our other Cardboard Doll House Furniture & other Doll House Furniture

How to Make a Paper Doll House Table & Chairs


Materials Needed

Printer

Paper

Scissors

Glue

Crayons or Markers (optional)


Below are the printable templates.  Click on the image to make larger and to print.

High Backed Chair

High backed chair printable color template

High backed chair printable black & white template


Common Chair

Common chair printable color template

Common chair printable black & white template


Stool

Stool printable color template

Stool printable black & white template


Table

Table printable color template

Table printable black & white template


All Furniture on One Template

All furniture printable color template

All furniture printable black & white template


Step 1

 Print out paper template.

Print out paper template.

[ad#ahc]

Step 2

Cut out furniture.

Cut out furniture.


Step 3

If you printed out the black and white templates.... color them in.

If you printed out the black and white templates…. color them in.


Step 4

Fold on dotted lines and glue together.

Fold on dotted lines and glue together.


Finished paper doll house table & chairs

And, there you have it.  You have just finished making a paper doll house table and chairs.  This doll house furniture would go great in any doll house.  If you don’t have a doll house…. why not make one.  We have a couple for you… check out How to Make a Cardboard Doll House and How to Make a Shoe Box Doll House.

Technorati Tags: , , , , , , , , , , ,

How to Make a Indian Girl out of Paper with Printable Foldable Papercraft

Well, earlier today we made an Indian boy out of paper.  It would make sense that I would post an Indian girl next.  If you thought that, you are absolutely right.  Indians were a very important part of Thanksgiving happening at all.  They taught the Pilgrims how to grow food…. before that the Pilgrims were starving to death.  After the Indians taught the Pilgrims how to grow food they had an amazing harvest and that’s how Thanksgiving came about.  So, let’s make our Indian Girl out of paper.

Check out our other Thanksgiving Crafts.

How to Make a Indian Girl out of Paper


Materials Needed

Paper or Card Stock

Scissors

Glue

[ad#ahc]


Below is the printable template.  Click on the image to make larger and to print.

Printable template for Indian girl paper craft


How To:

Cut out items on template… make sure to cut around tabs carefully.  Fold on lines and glue tabs together.  When dry glue feathers on to headband.  Glue the braids on the sides of the head.  Your finished Indian girl should look like this.

This is how your Indian Girl should look.


Isn’t the Indian girl adorable.  She is very cute.  And, she will look even better beside all the Thanksgiving characters like the TurkeyPilgrim girl, Pilgrim boy and the Indian boy Make sure to do them all.

Make all 4 Thanksgiving Characters

Technorati Tags: , , , , , , , , , , , ,

How to Make an Indian Boy out of Paper with Printable Foldable Papercraft

The Indians were an important part of the first Thanksgiving.  After all, if it wasn’t for the Indians the Pilgrims wouldn’t have had such a wonderful Harvest back in 1621.  And, if there was no harvest there would have been no Thanksgiving.  The Indians taught the Pilgrims how, what and where to plant the food.  So, today I’m going to show you how to make an Indian Boy out of Paper.

Check out our other Thanksgiving Crafts.

How to Make an Indian Boy out of Paper


Materials Needed

Paper or Card Stock

Scissors

Glue

[ad#ahc]


Below is the printable template.  Click on the image to make larger and to print.

Printable template for Indian boy paper craft


How To:

Cut out items on template… make sure to cut around tabs carefully.  Fold on lines and glue tabs together.  When dry glue feathers on to headband.  Your finished Indian boy should look like this.

Your finished Indian boy should look like this.

What a cute little Indian boy.  Now, make sure to come back to make all the Thanksgiving Characters.  We will make a Pilgrim boy, Pilgrim girl as well as an Indian girl.  All your characters will look so cute together on Thanksgiving. And you might even want to do the foldable  papercraft  Turkey.

All your characters will look so cute together on Thanksgiving.

Technorati Tags: , , , , , , , , , , , ,

How to Make a Pilgrim Boy out of Paper with Printable Foldable Papercraft

I have a paper craft that is perfect for kids of all ages…. even the youngest of children.  In this post I’m going to show you how to make a Pilgrim Boy out of Paper.  Just use the included template, cut and paste… that’s it.  And, don’t be fooled by the ease of this craft…. it is still a ton of fun.  Keep an eye out for other Thanksgiving paper crafts as I will be showing you how to make a Pilgrim girl, Indian boy and even an Indian girl.

Check out our other Thanksgiving Crafts.

How to Make a Pilgrim Boy out of Paper


Materials Needed

Paper or Cardstock

Scissors

Glue


Below are the printable templates.  Click on the image to make larger and to print.

Template Page 1

Pilgrim boy Template 1


Template Page 2

Pilgrim boy Template 2


Step 1

Print off Template Page 1.  Cut out Pilgrim boy being very careful to cut around all the tabs.  Fold on lines and glue tabs together.  Let dry.

[ad#ahc]

Step 2

Print off Template Page 2.  Cut out Hat being very careful to cut around all the tabs.  Fold on lines and glue tabs together.  Then glue blue tabs to bottom of hat.  When hat is dry… push down over top of Pilgrim’s head.


Finished Pilgrim boy paper craft

See, you did it!!  Now, you have a Pilgrim boy.  Make sure to come back because I will be showing you how to make a Pilgrim girl, Indian boy and an Indian girl.  All together it will make for a great Thanksgiving decoration. And you might even want to do the foldable papercraft Turkey.

Make all 4 crafts for Thanksgiving

Technorati Tags: , , , , , , , , , , , ,

How to Make Handprint Turkeys – 4 Methods

One of the easiest and most effective ways to show children how to draw a Turkey is to have them trace their hand.  That method was used when I was a child and they still do it now.  Today I will show you 4 methods to make a Turkey…. all using the children’s handprint.  Try all 4 methods and see which handprint turkey you like best.  I can’t help myself…. I love them all.

Check out our other Thanksgiving Crafts


Method 1

use tempera paint to pain the palm and thumb of the child brown

Materials Needed:

Brown Tempera Paint

Different Colors of Tempera Paint for feathers

Paper

Googly Eyes

Construction Paper

Black Marker

Scissors

Glue


How To:

Use tempera paint to paint the palm and thumb of the child’s hand brown and the other fingers different colors for feathers. Then place the child’s hand on paper. Let dry and then add googly eye…a triangle for the beak…and oval for the wattle.  Also, draw legs and feet.

[ad#ahc]

Method 2

Trace the child's hand on different colored paper

Materials Needed:

Brown, Red, Yellow, White and Green Construction Paper

Pencil

Googly Eyes

Scissors

Glue


How To:

Trace the child’s hand on different colored paper. Cut out brown circle and oval for body and head.  Add googly eyes…construction paper triangle beak…oval neck for the wattle….then paste the handprints in the back of turkey for feathers.


Method 3

Cut out a number 8 shape (a smaller circle on top of a bigger circle) out of brown paper

Materials Needed:

Brown Paper

Different Color Construction Paper

Googly Eyes (optional)

Glue

Scissors


How To:

Cut out a number 8 shape (a smaller circle on top of a bigger circle) out of brown paper…or just cut out 2 brown circles.  Cut out construction paper ovals for eyes or use googly eyes.  Cut out a diamond for beak…and then fold it into a triangle for the beak. Cut out oval for the wattle. Cut out lots of different colored construction paper handprints and glue them to the back for feathers.


Method 4

Cut out 2 different sized and colored circles for head and body

Materials Needed:

Different Color Construction Paper

Different Color Paint

Scissors

Glue


How To:

Cut out 2 different sized and colored circles for head and body. Cut out a diamond for beak…and then fold it into a triangle for the beak. Cut out oval for the turkey’s wattle.  Cut out thin rectangles to make the legs and feet. Paint the child’s hand and then place it on the paper for feathers. Use different colors for a nice effect.


There you have it…. 4 different methods for making handprint turkeys.  Which one are you going to make?  Oh heck…. make them all.

Technorati Tags: , , , , , , , , , , , ,