|
|

Home > Arts and Crafts Projects for Kids > Hats Making Crafts for Kids
Below you will find many hat making crafts such as arts and crafts projects to create homemade hats, visors, crowns, caps, and other items that you can wear on your head. How to Make Homemade Hats, Visors, Caps, Crowns, Tiaras, and Bonnets with the following arts and crafts decorations, instructions, patterns, and activities for children

For a costume party, or just for the fun of it, design a Spanish hat from hard black paper. First cut a disk about 12 inches across. From its center, cut out a smaller disk. The large part will be the brim, and the smaller part the top of your hat. With tape, attach a strip of black paper about 4 inches wide around the inner curve of the brim. Use as many pieces of tape as you need to keep the strip secure. Then fasten the top, also taping from the inside. You can attach a large rubber band or string to tie under your chin so the hat doesn't blow away.

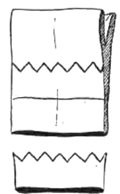
To Make a crown, just lay a brown grocery bag flat on your table. Now just cut across the bag twice ... cut it straight on the bottom of the crown and cut it zig zag to form the peaks of your royal crown, as shown in the picture above.

To make a New England fisherman's hooded hat, spread on a flat surface before you a piece of cloth, preferably woolen, measuring 2/3 or 3/4 of a yard. Mark the lower corners A and B. Hold these corners until the hood is finished. Mark the upper corners X and Y, as seen in Fig 1. Fold the corners A and B up to meet corners X and Y, as in Fig. 2. Then bring down A and B to meet at C and D, as in Fig. 3. Turn the material completely over, laying it down the other side up, as in Fig. 4. Then still keeping hold of corners A and C and B and D turn down in a triangle toward the center. The lower edge of the fold should be parallel to X and Y, and the lines A C — E and B D — F should be vertical, as in Fig. 5. Keeping your fingers at AC and BD, use the thumbs to pick up the edge XY and roll it 3 or 4 times as shown in Fig. 6. Then still holding onto the corners (to prevent a turning of the hood upside down) place it on your head and tie the ends under your chin.

If you are in the mood to play dress up, then making a Kings or Queens crown is a fun thing to do. Get a piece of paper or cardstock. Yellow works best or you can just color it too. Cut a strip of 5 inches high and then wrap the piece of paper around the head and cut the piece of paper down to a bit longer than that size. Cut rectangles out of the top of the strip of paper. Decorate the crown with red diamonds or other shapes. Optionally ... take a strip of paper and staple it to the center of the crown to make it last longer.

To make this medieval battle helmet, you will need to measure the distance around your head to make sure that you make the right sized helmet. Do this by using a piece of string and then measuring it on a ruler or by using a tape measure. Here is a template to cut out for the sections of your hat. To know how many sections that you will need...it depends on the measurement of your head. If your head is 21 inches around then you will need 7 of the sections (each 3 inches wide)...if your head is 24 inches you will need 8 inches...and so forth and so on. Now just trace the sections on to stiff paper or light cardboard. Glue these together with the tabs. Also glue a 1.5 inch circle of cardboard at the top where they connect. For the bottom, cut out a 22 inch strip and every half inch or so cut a rectangle or a triangle. Glue the ends together in a circle and glue them to the crown's base. You can glue a piece of cloth or felt in the back of the crown to look like extra armor.

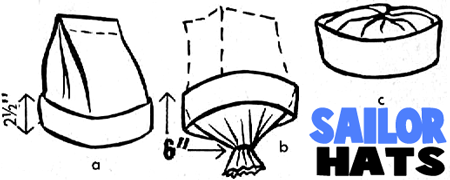
Find a white paper bag (a lot of time Chinese restaurants, pretzel or bagel shops and bakeries give them out). Fold the top of the bag back 2 1/2 inches. Now fold again to make the brim 2 1/2 inches wide to look like (picture a). Cut off the bottom of the white bag and then gather the cut end side together. Now pull the gathered end downwards thru the folded brim ( as seen in picture b). Place a rubber band around the gathered end to secure it tightly (about 6 inches from the last fold). Cut off excess bag that is under the ruber band. Now push the gathered ends back thru brim of hat to create the very top of the hat (as pictured in illustration c). This is a great sailor's cap to wear for a costume party or to play pretend.

(Never Put Plastic Bags Over Your Face - This is only for kids old enough to know not to do this) You will need the sort of plastic bag that you get from the grocery store fruit and vegetable sections. Now fuld up the open end of the plastic bag a few times to form a cuff as seen in the first picture above. Try to place over your head to see if it fits right to determine how many folds you need. Glue the inside cuff to bag. Now close the closed end by gathering together and tying shut with string, ribbon, or yarn as seen in the 2nd picture above. Now get felt or colorful paper and cut into cool shapes and designs. Then glue all over the bag to decorate. When all the glue has dried, your beanie is ready to wear

You will need one 7" x 23" piece plain paper for pattern, one 7" x 23" piece corrugated cardboard, 10 stars stickerse (optional), 5 toothpicks, 1 paper clip or 1 rubber band and 2 paper fasteners or 1 bobby pin, glitter, glue, pencil, ruler, and scissors. Enlarge, trace, and cut out crown pattern. Trace pattern on corrugated cardboard. Cut out crown. Corrugated side, which is to be worn out, may be decorated by attaching sticker stars to toothpicks (sticking them back to back with toothpick in center) and slipping toothpicks down into ridges in paper. Spread thin film of paste around edges of crown and sprinkle with glitter. Fit crowns to children and fasten (1) by slipping bobby pin or paper clip in ridges to secure ends or (2) fasten rubber band to paper fasteners placed in ends of crown. The latter makes an adjustable band.

If you are having a get together with your friends and need a party hat that is quick, cheap, and easy to make, then these envelope hats are just what you need. Just get a stack of envelopes out and some ribbons. You only need one envelope for each hat. Draw a circle line across an envelope (as seen in a above). Then cut one inch lines into the circle. Cut a hole on each side of it and run a pull a ribbon through the two holes. Your friends can then tie the ribbons under the chin to keep the festive hats on. Every successful party needs gay, colorful party hats as well as ice cream, candy, and cake. You can make enough party hats for all your guests.

Glue, paste or fasten navy blue crepe paper over a rectangular cereal box with a carefully opened top to make a peak (with Scotch tape). To the front of the hat, glue or paste on letter initials from the dollar store, or paper initials which you have cut out yourself, to spell out the name of a guest. Add a red crepe paper or yarn tassel to the top, and an under-chin band of yarn, string, ribbon or elastic.

Make a cardboard cone to fit your head and fasten the edge with Scotch tape. Glue or paste a newspaper covering over the cone. Glue or paste on a row of bright yellow ribbon, yarn, or crepe paper pompons to cover the raw edge. Add an under-chin tie of yarn, string, ribbon or elastic.

Glue, paste or fasten with Scotch tape, pleated colored paper napkins or crepe paper around a cottage cheese or some similar food container. Folk back the edge of the napkins or crepe paper to make the brim. Glue or paste on a contrasting color pompon or yarn, ribbon, or crepe paper. Add an under-chin tie of ribbon, yarn, string or elastic.

Measure and cut out a cardboard crown to fit your head. Glue or paste metallic paper to the crown. Glue or paste brightly colored stars around the crown.

Cover an ice cream container with a brown paper bag. Fit and tape the bag to the container neatly with bits of Scotch tape. Add yarn, paper, or ribbon trimmings and under-chin ties.

Glue or paste metallic paper or tin foil around a cylinder salt box. Cut a small peak from cardboard and cover with the same metallic foil. Fasten the peak to the hat with Scotch tape. Glue or paste on a yarn, ribbon or crepe paper pompon. Make the under-chin tie of yarn, string, ribbon or elastic.
 Make Witch’s Hat for Your Halloween Witch Costume with This Crafts Idea - This witch’s hat will be fun to have for a Halloween party, to play dress-up, or just to go Trick-or-Treating. Add a mask and broomstick and you can scare your friends.
 Indian Feathers Headdress - Learn how to easily make a realistic looking Indian Feathers Hat / Headdress...one that a chief would have worn.
 Make a Party Hat - Celebrate in style by making your very own party hats.
 How to Make a Spring Easter Bonnet, Hat, or Flower Crown with Your Kids - A Spring bonnet is a longstanding tradition for little girls in many families – and calling it a flower crown will make any little boy excited to be the king of spring!
 How to Make a Native American / Indian Headdress Headband Costume from Corrugated Cardboard - This is a really cute idea to make a Native American Indian Headdress for a Costume or to just play dress up. This is easy enough for kids 8 years and older to make themselves.
 Leprechaun Hats to Make - Learn how to make these adorable leprechaun hats to celebrate Saint Patrick's Day.
 Making Fairy Crowns - This is a perfect fairy crown and it will look beautiful on your little fairy. You make this crown with wire and ribbon. Beautiful.
 Paper Roll Native American Headdress - Learn how to make this cool Indian Cheif hat with a roll of paper and some scissors.
 How to Make Abe Lincoln's Hat - Learn how to make Abe Lincoln's hat with an oatmeal container and a paper plate.
 Make Spring Princess or Fairy Flowers Crown Craft for Girls - Want to pretend to be a Spring flower princess or fairy? Here are easy instructions to make yourself this beautiful crown that is made up of paper flowers. The simple steps to make this craft are given below.
 Learn How to Make Crepe Party Hats - Get a food container and some crepe paper to decorate a great festive hat.
 St. Patrick's Day Leprechaun Trap Idea for Children - Young children love to try to make a Leprechaun trap, here is a fun way to do just that.
 Ideas for New Years Eve Party Hats - Learn how to make some pretty cool party hats for New Years Eve Celebrations.
 Ideas for Costume Hats - Here are a bunch of illustrations on how to make quick hats for costumes.
 Make a Flowered Bouquet Fairy Crown - Make this beautiful fairy crown from Polymer Clay.
 Easy-to-Make George Washington Hat - This paper hat is so easy to make that young children can make it or at least help make it.
 Make Devil Horns Headband - Make these devil horns for your devil costume.
 Making Butterfly Headbands - Learn how to make these butterfly headbands with a headband, and transparent foil.