|
|

Home > Arts and Crafts Projects for Kids > Book Making Crafts to Make Handmade Books with Arts and Crafts Projects Ideas for your Kids
What can be more fun than making your very own books? You can write your very own stories and be as creative as you want...doesn't that sound so cool? You can then make your own binding and keep your creative book forever. When your an adult you can show your children the books you made as a kid. You can also make your very own journals or diaries and make the cover and inside pages so beautiful...any design that you want. Below you will find book making crafts ideas and projects for your kids. Find out how to make your own handmade books arts and crafts projects with the following decorations, instructions, patterns, and activities for children

Stack up some pieces of paper and fold in the center. Make three holes in the pages and pull cords through 2 of the holes. Both of the cords can be pushed through the center hole as pictured above. Now that cord is pulled through the back of the book and tied in the back of the books seam.

This is a great first book making project for kids because it is super easy to make and you don't have to make the binding for it. All you have to do is cut 2 rectangle pieces of paper...both the same size. Then criss-cross them like you see in the illustration above. Glue them together on the one square where they meet. After that dries then you can write your criss-cross book on the inside. You close the book by closing the square upon itself.

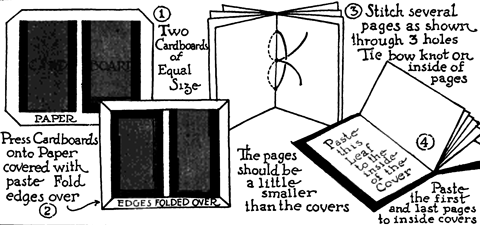
Look at the diagram above to see another method of making your very own books. This time cut 2 pieces of cardboard that are both the same size. Cover both pieces of cardboard with paper...then cut diagonals on the paper, at the edges. Then fold edges over as if you were wrapping a present. Now get a stack of paper and fold them in the center. Then stitch the pages to the binding...and tie in the center of the book with a bow. Paste the first page and the last page to the cardboard inside covers. You now have a professional looking book...and you made it all on your own.

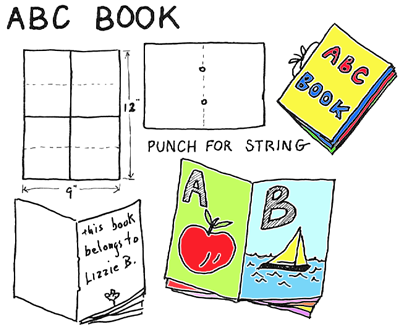
This is a great first-time-book-making project for younger children in the earlier grades. Not only can they learn about the Alphabet and words that start with different letters, but they can also learn how to make a beautiful book of their very own. These books can be made with magazine cut-outs, internet clipart print-outs, or by the child's own drawings. It is up to you and the child who is making the book. To make this book, use 2 pages of 9 inch x 12 inch paper (colorized or plain white ... either is fine). Cut 4 pages from each piece of 9x12 paper....making 4 1/2" x 6" pages. Fold each of these pages in half. Now your book will be 3 inches wide and 4 1/2" high. Your book will have thirty-two pages (26 pages for the alphabet letters plus the cover and title pages). You can make the holes in the center of teh book with awl or hole punchers. Then just tie a piece of string through the back of the book to keep all the pages together.

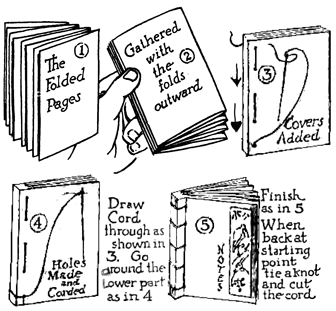
Look at the above instructional illustrations to learn how to make your very own Japense bound books. First get a long piece of paper and accordian fold them all into equal sized pages. You do this by folding forwards and then folding backwards and then folding forwards and then folding backwards again, and continue to do this. If you want more pages, then you can overlap the pages as seen in the illustration below.

Then gather the folds outwards, holding it with your hand from the other side, as seen in picture #2. Then add your covers...whether that is fabric, decorative paper, etc. Then sew everything together by putting the needle through the back and then pull it through the front. Put it back down in through the front and pull it out the back...that is one stich....do one more stitch and then pull tahe string / cord through the back and pull out the front one last time...as seen in picture #4. Now with the cord in the back, come around front with the needle and pull it through the thread. Then pull it around and pull it through the back stitch. Then bring it around front and pull the thread through the front stitch and continue to do this. Look at the illustrations above to see what I mean.

Make somebnody that you love, this special heart booklet. Even better, fill it with reasons for why you love this person so much. Your loved one will cherish this heart book forever and ever. Firstly, get 6 pieces of paper, all the same size. Fold each piece of paper in half, then find a wooden block to press down the fold into a nice crease (picture #1). Put one page inside another until all 6 pages are gathered together. (picture #2). Then fold a red piece of paper in the same way and then add all the white (or other color) pages inside the red piece of paper and use a big paper clip clamp to hold them together. Draw a half heart on this paper with middle of heart on the fold (picture #3). Cut out the heart (picture #4). Unclamp the clip. Then open up the heart pages and clamp together at the top this time. Poke 3 holes in the middle of the heart with a needle. Cut a very long string and knot at the end. Put the needle and string up through the back of the heart into the middle hole and pull through until knot stops the string (picture #5). Then (picture #6) shows you how to sew the book's seam. From the middle hole, go down into top hole, and up thru the 3rd hole and again down into middle hole. Then tie a knot in the back and keep the extra strings (if you want to) to add beads on them. Inside the book, draw or add photos of your Dad, you and your family and write on each page a reason why you love him so much. Or, you can tell a story about you and your Dad. Either way, fill this book with all of your love to show your Dad just how special he is.

You don't have to use scrolls for religious purposes ... you can just use it for a cool book form. You will need a piece of white paper 24" x 6"; two 8" wooden dowels (or you can use nice sticks that you find from outside); and masking tape. Whatever you choose to write or draw should be written before you make it into a scroll. Historically, scrolls are written from right to left, instead of left to right as we write today. Now you can attach the end of the paper strip to one of the dowels with the tape....making sure that it is secure. Also make sure that the paper is centered onthe wooden dowel. Now you can roll the paper strip onto the left dowel.

This is a good school project. You can have a child illustrate a story they just heard or read (to test comprehension) or you can have them illustrate their own story. Each child will need several sheets of white paper; 1 piece of 12" x 9" colored or decorative paper; a piece of yarn or string or ribbon; a paper hole puncher; pencil; and glue. Now the children should fold the sheets of white paper in half cross-wise. Then, the kids should fold the colored paper in half ( for the book's cover). Now the kids can put the white paper into the colorized paper,. Then punch holes in the folded side of the paper and then tie all the pages together with string or yarn or string (sketch c). Now the children can illustrate the story with skinny stick figures or better figures if they can (sketches a and b). Discuss scenes to be illustrated and draw one on the board to help child get started. Let child draw a figure on cover of his book to represent himself and then print his name.

You will need 6 or more double plastic pages such as used in loose - leaf binders, 6 or more pieces colored construction paper 8"x10 1/2", yarn or colored shoelaces, pictures, and glue dots or double sided tape or photo mounting tape. Tie plastic pages together with yarn or colored shoelaces. Put one piece colored construction paper in each. Slip pictures between the plastic page and paper (see sketch). Pictures may be held in place with a small amount of glue dots or other adhesive on back of each. Pictures are easily removed after the lesson is taught and may be filed for future use. The booklet may be used to teach memory work, illustrate or review stories.

Stack 5 pieces of 9"x12" construction paper together. Then you will want to fan these pieces of paper so that they overlap each other about 1/2 inch each. You will want to fold somewhere near the center so that they look like they do in illustration a. Now, use a hole puncher to punch 2 holes at the seam of the book. Now take a ribbon, and put the ribbon thru both holes and then tie a bow on the outside, as seen in the illustration b above. Then you can decorate it however you like. You can fill it with a story, or use it as some sort of journal.
 Making a New Years Memory Accordion Pocket Book to Hold Precious Memories - You can use this special fold-up, accordion pocketed book to hold all the memories of this year or next year … and then you can put it away as if it were a time capsule. Then you can try not to look at it for 10 years. You will be surprised at how much you have changed in that amount of time. Have fun.
 Make Picture Folder Gift Book with Accordion Fold Out Photo Holder - You can either use real photos or make your own comic book or use pictures from a magazine to make a funny story. This is a great craft to build imagination or to give as a gift to a loved one or friend.
 Make Recipe Books for Recipes for Mom on Mother’s Day - What Mom or Grandmother doesn’t love getting a personalized recipe book? This one is so special too….It is completely filled with envelopes so your Mom or Grandma can put recipes that they find in magazines or books, and keep them all in one categorized place. Make this for Mother’s Day, for a gift on a birthday, or any other reason you have to show love to your family and friends.
 Secret Book of New Years Resolutions - This is a fun book to make with friends and family. Every page is sealed until the following year....find out how to make it too.
 Make a Playing Cards Love Book - This is a book that you make from a deck of playing cards. Tell the person you love the 52 reasons why you do love them. Awesome.
 Mini Book Pendant or Necklace - Make this little book on a cord as a stylish necklace.
 Make a Family Newspaper to Talk About Family News - This is a great crafts idea that will produce a keepsake to cherish in years to come.
 Thanksgiving Memories Scrapbook - Thanksgiving is a time to think and talk about all the great things that have happened throughout the year. Here is a memory scrapbook that you can make to remember this year’s Thanksgiving forever. Use it to start a conversation about the great times you had as a family through the year. You can use printed out photos, pictures from magazines, stickers, or draw your own pictures to decorate your book. Find easy directions below.
 Pendant Booklet That Opens Up Into a Daisy - Your Mom or Grandma will love this thoughtful necklace that holds a book that transforms into a flower. How pretty.
 How to Make an Autograph Book - Is it the last day of school or camp, then how about making an autograph book..here are instructions.
 Jump Ring Journals - Use binder rings to hold a book together - such as this travel journal.
You Might Also Like Our Resource Crafts Page for Making Special Journals