|
|

Home > Arts and Crafts Projects for Kids > Flower Crafts Arts and Crafts Projects Ideas for your Kids
Flowers are so beautiful and they smell so refreshing, and the best part is that they are found naturally ouside. I mean you can't walk outside without seeing several different types of flowers. Even if you live in the city, you will probably still see some rogue flowers growing out of a brick sidewalk. If you live out in the suburbs or the country though, you will see them everywhere. So it is only natural that you would want to use some of those naturally-growing and "free" flowers in your next arts and crafts project. This page is dedicated to crafts that use real live flowers in them.
Children love making flowers, especially when they have no garden to pick from. Flowers makes everything look much prettier, for example, greeting card, crowns and paintings. Children can also make a paper flower bouquet with little materials needed.
Flower crafts are more popular during the spring time when a lot of beautiful flowers starts blooming. It's also popular near Mother's Day and Valentine's Day too. Girls can make a beautiful flower crown from construction paper, crepe paper and whatever sparkling decorations they can find (gems, glittler, glitter glue, etc).
Maybe you are instead looking for : Making Fake Flowers Crafts

Collect some small leaves or tiny flowers, put them between two pieces of blotting paper and press them in a book for a while. Meanwhile, prepare some paper strips, cutting the edges with scissors if you like. Fasten the plants to the paper with very small tape patches, or with glue, and cover the entire front with cellophane. Make a bookmark for yourself and make others to give to your family and friends.

Sounds funny...grass balls...doesn't it? Who has ever heard of grass balls...that is just wierd. So lets try it then. Go and find the following items. A piece of absorbent cotton about 2" thick, 10" length of string, yarn, or ribbon, grass seed, thumbtack, water, and paper towels. Roll the cotton into a nice round ball, then tie the string or ribbon to it (see sketch above). Wet the cotton ball gently in a pan of water. Roll the ball in grass seed which has been spread out on paper towels. Be sure the entire ball is covered with seed. Tack in a dark place for two days, then place in the sun. Soon you will have a green ball. Be sure to keep it wet after you hang it.

Find a box with a lid such as a chocolate candy box or a cigar box. Trace a few circles (a bit smaller than an egg shell) on the box with cups, caps, or lids as a tracing item. Now cut the circles out carefully. Get some egg shells and chip off the shells until it is an almose perfect edge. Then place soil in these and then either place flowers in them or plants or seeds to grow.

Remove the rubber bulb from an eye-dropper. Scrape the pointed end against a candle or wax crayon. This will plug up the tiny opening. If you are using a small vial, you won't have to do this. Spread paste along the dull side of the ribbon. Then, starting at the bottom, wind the ribbon around the glass, up to the top. Fill the tube half way up with water. Seal the top of the tube with a plug of wax from the candle so that the water will not spill. Be sure your wax stopper is thin enough so that you can push a pin through it to make a hole when you want to put your flower in the vase. Now tie a pretty bow around the top of the tube. You can pin the vase on your lapel by pushing a pin through the ribbon.

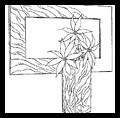
This makes a beautiful gift for Mom, Grandma, your sister, your aunt, or somebody else that you love. Firstly go out and pick some beautiful wild flowers. Then press those flowers in between 2 paper towels and then place it in a heavy book for 3 weeks, as seen in (picture #1). Then get 2 pieces of colored constructoin paper. Cut an oval or a rectangle in the center of these pieces of paper as in (picture #2). Then dot glue all over the first piece of paper as seen in (picture #3) and then place plastic wrap on top of it. Then place the flowers in the center of the plastic wrap...in the inside frame section, as seen in (picture #4) and then dot glue on the plastic wrap (outside edge) and some on the flowers. Then place another sheet of plastic wrap. Then dot glue on the outside edge of the saran wrap again. Then place the 2nd construction paper frame that you made earlier. Let everything dry and then punch 2 holes at the top of the frame. Thread ribbon, yarn, string, or cord inside the 2 holes to allow the gift reciever to hang up the dried flowers picture.

For this flower-making craft, you will need a 6" square of aluminum foil, a 12" length of colored ribbon, a 4" square of cotton, a 5" or 6" lace paper doily, scissors, and a few summer flowers. Then lightly fold a doily in center and snip two 1/2" slits, one crossing the other (see sketch). Tie flowers with colored ribbon and slip through opening in doily. Wet cotton square and wrap around flower stems. Wrap foil around cotton and stems and secure around opening in doily. Now you have a lovely doily flower gift. You can decorate the doily if you want, such as coloring it or pasting on attractive gummed stickers.

Firstly, have Mom or Dad help you collect different kinds of flowers, leaves, stems, blades of grass, ferns and anything else you might find outdoors. Try to get flowers of different sizes and colors. Place your pieces on the floor or table. Start by using a flower as a head. Next, use a leaf for the body. Smaller leaves or blades of grass will make fine arms and legs. For shoes, use small flowers or clover leaves. Use anything you like that will make an interesting figure. For example, you can make a gay hat from a bit of fern or hair from grass. Once you have finished a figure, make it different by using other pieces. You can change the costume in many funny ways!

First of all, cut a milk carton about 3 inches from the bottom and throw away the top part of the carton. Now wrap the outside of the milk cart with wallpaper or decorative paper. If using wallpaper, then just cut 3 inch strip of it, wet it with sponge, and push it into the container. Fasten it with two rubber bands until it is completely dry and set. Now all you have to do is add soil and a plant to the planter. Water plant regularly.

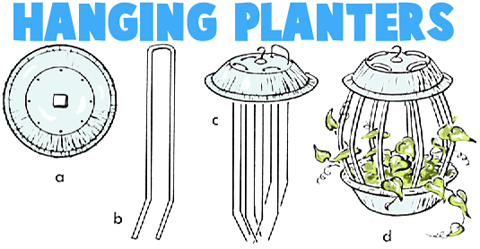
You will need : 3 aluminum foil pie tins (3" diameter), four 18" lengths No. 3 round "strapping" copper or aluminum wire, 1 small nail, 1 cup hook, 1 small block of wood 1" x 1" x 3/4" or 1/2", stapler, 1 plant, and enough soil to fill 1 pan. With nail, punch eight evenly spaced holes around the bottom of two tins (sketch a). Place small block of wood in center of one perforated tin. Screw cup hook through outside of pie tin into block of wood so they fit together tightly. Bend wires in U shape to fit the space between the holes (sketch b). Insert bent wires through top of tin with cup hook attached. After all wires are in place, bend each wire in 2" from bottom (sketch c). Put these wires through corresponding holes in other. perforated pie tin. Work carefully so aluminum foil will not tear. After wires are all in place, fit unperforated pan under the bottom tin to cover wire ends and make a solid bottom. Staple the two bottom tins together around the edge of rims. Now shape the wires to give a Japanese lantern effect (sketch d). Fill bottom pan with soil, and plant vine or plant in soil.
 Make an Egg Head Plants Planter - This is sort of like a home-made Chia Pet...a plant that you grow inside a character's head...and it turns out looking like hair. Find out how to make it now.
 Foldable Flower Stand Craft for Mom - This is a great and easy craft to make a flower stand for your Mom...all you have to do after you make it is to buy or pick a beautiful flower to put in the stand.
 Dried Flower Pendant Necklaces - Learn how to make a dried flower necklaces to wear around your neck.
 Making Dried and Pressed Flower Cards - Learn how to make these beautiful dried and pressed flowers card.
 Fresh Flower Bracelets - Learn how to make a beautiful fresh flower bracelet.
 Egg Shell Flower Baskets - Hang flower planters from your tree's branches...the planters are just hollowed out egg shells and hung with ribbons. These are great for Easter.
 Pressed Flower Cards - Make a nice greeting card for Mothers Day, Easter, or for someone who is feeling sick. The real flower adds a beautiful sentimental touch to the greeting card.
 Egg Shell Gardens - Use your blown egg shells as little planters for your plants or flowers. Put your little garden outside or on your windowsill.
 Foil Pan Wall Hanging Vases - This wall vase is made from a foil pan and a plastic toothbrush holder.
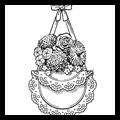
 Flowers in a Doily Baskets - Making these baskets filled with flowers can really cheer up someone thatyou love. Hang them on the wall and brighten up any room.
 Tin Can Gardens - Find out how to make these beautiful corned beef can planters.
 Doily Wall Hangers - Hang the flowers on the wall with these flower vases that you can hang up.
 Matching Tin Foil Vase and Photo Frame - Make this photo frame from cardboard and tin foil...make a matching milk carton vase.
You Might Also Be Interested in Our Making Fake Flowers Crafts