|
|

Home > Arts and Crafts Projects for Kids > How to Make Clay and Dough Projects with Ideas Crafts for Kids
Below you will find many Dough and Clay activities crafts ideas and projects for kids. Find out how to make your own Clay, Play Dough, Salt Dough, etc Arts and Crafts creations with the following instructions, patterns, and activities for children
1. Clay can be kept in a crock or a galvanized container. The clay should be covered with a damp cloth so that it will remain moist and pliable.
2. Scrape of dry clay may be reconditioned by soaking them in a container of water (making). Drain the excess water off and stir the liquid clay until it is smooth. Impurities may be removed by running the liquid clay (slip) through a cloth or strainer.
3. Clay cannot be "baked in an oven"; it must be "fired in a kiln" at a temperature of at least 1500 degrees Fahrenheit.
4. If you do not have a kiln, the dry pieces may be painted and shellaced.
5. Details (handles, eyes, nose, ears, etc.) which are added to pots or figures must be made of wet clay and must be of the same consistency as the piece of clay to which they are added. These additional parts should be applied with slip (liquid clay) and "welded" firmly to the piece.
6. If the clay is free of air bubbles and if you have a kiln, the dry clay pieces may be fired and glazed.

4 cups of flour
1 cup of salt
2 tbsp cooking oil
1 1/2 cups water
food coloring
Mix the flour and salt together in a bowl. Then add oil and water together until the mixture is smooth. Then knead the dough into a ball, as illustrated above. Next separate the clay into a few different balls and then add different color food coloring in each ball and knead the color into each ball. Then put the clay into a plastic bag and refridgerate for an hour. Then go ahead and play with your clay / play dough.

You can make so many cool things out of clay. Use the above pictures to learn how to make some really col objects and animals. Start off by rolling the clay between the palms of your hands. You will get a ball from this process. You can make things like fruit, owls, birds, nut shells, and tea pots fromt his shape. Then try pinching the clay to get objects such as the baby's chick's oval body. You would pinch the clay and then push the clay inwards for the birds nest. Press the clay between your thumbs and fingers to flatten it out to make objects such as grapes, and leaves. Play with the clay to figure out even more techniques and methods of sculpting.

Clay is an amazing material to work with. Young and old people alike can make amazing forms with clay. The above illustrations will show you how to make different objects with a ball of clay...such as pottery, an igloo, and a mushroom, and a cat. Follow the instructions and diagrams above to make some neat forms. And most importantly...have fun.

Look at the illustrations above to learn how to make a cube from clay. You basically just take a ball of clay and flatten on all sides by following the instructions above. Now you can make many objects from those cubes.

You will need enough clay for a medium size jar or vase (not plastic type if permanency is desired), plastic or oilcloth table covering, molding tool such as popsicle stick. Lay out table covering. Prepare clay by kneading it and then throwing it hard on the table covering several times to break up any air bubbles. Roll a piece of clay into a ball and then flatten like pancake to make the bottom of the jar (sketch a). From the rest of the clay make long rolls or coils of equal thickness. Build up sides of the jar by winding the coils on top of each other around the edge of the base until the desired height and shape is obtained (sketch b). Then gently smooth inside and outside with moistened fingers. A design can be carved into the clay with molding tools. Lay aside to dry (cover with a damp cloth for the first 24 hours if pottery clay has been used).

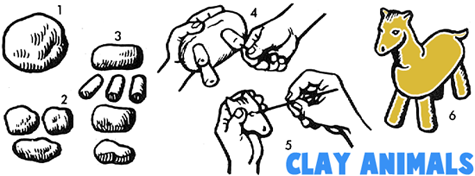
You will need ready-prepared modeling clay or the variety which can be mixed with water (from your hobby store); poster paints; brush; newspapers; and toothpicks Children will enjoy making animals out of clay. Spread newspapers on table and make animals as directed. When dry, paint with poster paints. Simple instructions for making animals are as follows: (1) Knead the clay and roll it into large balls. (2) Break it into smaller pieces. (3) Mold into shapes of legs and bodies. (4) Put together to form animals. (Toothpicks may be stuck through the legs and into bodies to hold animals together.) (5) Use toothpicks to draw in features. (6) Allow to dry.

Learn how to mold or sculpt animals such as bunny rabbits, ducks, roosteers, squirrels,a nd snails out of clay by looking at the illustrations above.

These clay beads turn out beautifully. Buy some self drying clay. Then form small clay balls by rolling the clay back and forth in your palms. Then get a nail and poke a hole in each clay ball. Make sure that when you take the nail out of the clay that the hole doesn't close back up. When the beads have completely dried, use acrylic paints (or other craft Paints) to decorate the beads as you see in the picture above. Get creative with it. After the paint has dried, you can start making jewelry from them, such as a braclet or a necklace. Get elastic, wire, string, or other item to string the beads onto. If you need a needle, but don't have one, you can use a pipe cleaner twisted into a loop to thread the string or cord onto in order to string the beads on. Take a look at the descriptive illustrations above to see how to do this. Tie the necklace or bracelet closed when you are done.

Simple in concept, but an amazing present to make for Mom or Dad. Just roll out that clay as flat as can be...shove your hand into the clay...let it dry...then paint. That is all there is to it. Now your handprint can last forever.

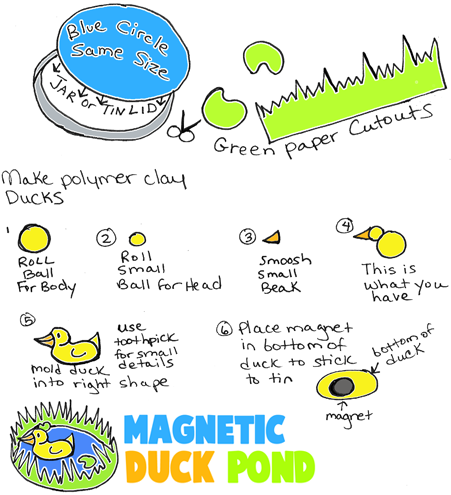
To make the ducks, roll a yellow piece of clay into a ball by rotating it back and forth in between your palms. Make a smaller ball too for the face and head. Press an orange piece of clay into a beak and attach to the duck's head. Smoosh yellow clay into the back tail feathers. Use a toothpick and carve details into the duck. Turn over the duck's body and stick the magnet into the bottom of the duck. Let the clay completely dry. To make the pond, use a tin lid, trace a circle with the tin lid. Glue the blue circle into the tin's lid. Cut out grass and lilly pads....and glue the lilly pads donw on the duck pond. Cut out the grass and attach around the tin. When al is dry, you can play with your duck pond.

Materials Needed are as follows : a piece of white cardboard (from laundry, suit-boxes, etc.) ; pencil; crayons; shellac; brushes; water colors; and salt clay. Draw a freehand picture on the cardboard in pencil (lightly). Color with crayons except area to be covered with salt clay (sketch a). Shellac picture and allow to dry. While picture is drying, mix salt clay. Mold onto picture in places desired (sketch b). When dry (about 2 days), paint with water colors.
 Sculpting with Fimo Clay : The Goldfish Crafts Project for Kids - I will teach you how to create a very basic fimo sculpture fish that most children will enjoy making again and again.
 Make Your Own Yo-Yos with Model Magic - Make these cool yo-yo toys by sculpting them with Crayola's Model Magic. Find out how.
 How to Make Clay Pinch Pots - Making clay pinch pots is usually what art teachers teach kids about first when dealing with clay. Find out the basics of making pinch pots.
 Polymer Clay Whistling Birdie Toy - Make a real Whistle that we call a whistling birdie with the following step by step tutorial.
 Colonial Tricorn Hat Badge - Celebrate the 4th of July by wearing a tricorn hat badge made from polymer clay.
 Techniques for Making Clay Sculptures - Learn about the different methods of making clay sculptures, such as molding, carving, and cutting & folding over.
 Make Halloween Decorative Pin / Brooch Ghosts - Make these polymer clay ghosts and turn them into brooches / decorative pins.
 Pumpkin Girl with Clay and Fabric - This is the cutest pumpkin I ever did see...learn how to make this amazing craft with the following step by step crafts instructions.
 Polymer Clay Ghost Earrings for Halloween - Learn how to make these polymer clay Ghosts and Earrings with the following simple-to-follow craft.
 Make Polymer Clay Christmas Tree Earrings - Learn how to make these Christmas Tree Earrings from Polymer Clay.
 How to Make Coil Pots - Learn the easy method of making pots with coils of clay.
 Make a Flowered Bouquet Fairy Crown - Make this beautiful fairy crown from Polymer Clay.
 Clay Reliefs and Maps - Learn how to make clay reliefs and maps.
 Clay or Play Dough Sailor Moon Wands - If you love Sailor Moon...this is a great toy wand to make and play with ... it is made out of play dough or clay.
 Clay Sculptures : People, Mice, and Turtles- Here are 4 examples of clay sculptures - clay heads, bodies, mice, and turtles.
 Clay Birds - Learn how to manipulate clay in order to make clay birds.
 Guide to Making Pinch Pots - Find out how to make the basic pinch pot with the following guide.
 How to Make Pretty Polymer Clay Earrings or Ear studs Hearts for Valentines Day - Learn how to make these adorable polymer clay stud hearts (aka heart earrings). You can give these stud hearts to your Mom, Grandma, friends, etc to show them how much you care about them…especially for Valentine’s Day, Mother’s day, or a birthday.
 Make Polymer Clay Finger Rings - These Polymer Clay Rings can be made and worn very comfortably and they are soooo cute.
 Making Clay Bowls, Dishes, and Mugs - Learn how to make clay bowls, dishes, and mugs with the coiling method.
 Make Fruit Pendants to Wear on a Chain - These Little fruit pendants would be great for a charm bracelet or necklace.
 Paper Flower Gardens with Play Dough Dirt - This is a fun crafts project to make, especially for kids who love flowers. This is a paper flower garden with brown play dough for dirt...find out how to make it by following the tutorial.
 Wooden Beaded African Charm Bracelets - I thought we could use this opportunity to make a craft for Black History Month. Today I’m going to show you how to make a Wooden Beads Bracelet with an African Mask Charm (made from polymer clay).
 Polymer Clay Ghosts and Black Cat Decorated Glasses - Decorate Your Glasses with Spooky Characters to Celebrate Halloween.
 Polymer Clay Turkey Brooch - Make a Polymer Clay Turkey brooch pin for Thanksgiving time.
 Making Toothpick & Clay Ornaments - Learn how to use styrofoam ball or clay as the base to stick toothpicks.
 Painted Clay Pots - East pot-making instructions - paint it any way that you want to.
 Pinecone Clay Hedgehogs - The pinecone is the body, but everything else about the hedgehog is formed with clay.
 Round 4 Scened Dioramas - These are unique dioramas that are made upon a round hat box lid. This is perfect for making different rooms in a house or for making four seasons of the year. The figures in the diorama are made with self-hardening clay.